Ever wondered why so many car enthusiasts are going for tinted tail lights? It's about more than just a quick style upgrade—it's a way to create a sleek, custom look while also protecting your vehicle's lenses.
While this guide will walk you through the DIY steps for your car, truck, or SUV, we always think it's best to be upfront: a professional installer is usually your best bet for a legal, long-lasting result that looks perfect.
The Enduring Appeal of Tinted Tail Lights
Tinting your tail lights is one of the easiest and most popular ways to make a stock vehicle look like a personalized statement. This trend gives your car a clean, streamlined appearance that really complements its factory lines, adding a subtle but very impactful upgrade. But it goes beyond just looks; it's a practical choice for your car, too.

This isn't some fleeting fad. We've seen it become a huge part of car culture, especially right here in City One, State and City Two, State. The numbers back this up. Back in 2015, we saw smoked tail lights on maybe 12% of the customized cars that came through our shop. Fast forward to 2023, and that figure has jumped to 38%.
That growth is thanks to a massive 150% surge in aftermarket automotive lighting modifications. It's a key trend driving the wider automotive tinting film market, which hit USD 7.59 billion in 2024 and just keeps growing as more car owners look for ways to protect and personalize their rides.
Why Car Drivers Choose to Tint
The decision to tint tail lights usually boils down to a couple of key reasons. For a lot of people, it’s purely about achieving a certain look—whether that’s a "murdered out" all-black theme or just a subtle smoked finish to tone down the bright red plastic from the factory. A simple change like this can make a car look more aggressive, luxurious, or modern.
The other big driver is protection. A quality automotive tint film acts as a shield against the elements, safeguarding your expensive tail light assemblies.
- UV Ray Defense: The film blocks harmful UV rays that cause plastic lenses to fade, turn yellow, or become brittle over time.
- Scratch and Scuff Resistance: It adds a protective layer against minor scratches, rock chips, and scuffs from everyday driving.
- Enhanced Durability: By shielding the lens, tint can extend the life and clarity of your vehicle's tail lights for years to come.
While DIY kits are everywhere you look, the explosion in popularity also shows why professional services are so valuable. Getting a flawless, bubble-free application that also follows local laws is a skill that takes a ton of practice. It's why so many car owners trust experts for their automotive tinting needs in City One and City Two.
This guide is here to give you the knowledge to tackle this project yourself if you want to. But we also believe in helping you make an informed decision. As you learn how to tint your tail lights, think about the balance between the satisfaction of doing it yourself and the guaranteed quality, longevity, and legal peace of mind that comes from a professional automotive tint installation.
Choosing Your Tinting Method: Film vs. Spray
So, you’ve decided you want that custom, smoked-out look for your tail lights. Great choice. The first big decision you’ll have to make is how you’re going to get it done. For the DIY crowd, it really comes down to two paths: adhesive vinyl film or an aerosol spray tint.
Each method has its own world of pros and cons. The right one for you really depends on your budget, your comfort level with this kind of work, and—most importantly—how permanent you want this change to be.
Think of it like this: if you're leasing a car in City One, State and need an option that's 100% reversible, film is your best bet, hands down. But if you’re a hands-on car owner in City Two, State looking for that deep, permanent smoked finish, spray might seem appealing. Let's dig into what you’re really getting into with each.
Understanding Vinyl Tint Film
Vinyl film is a thin, flexible sheet of tinted material made specifically for wrapping automotive lights. It’s the most popular method for a reason—it’s forgiving, consistent, and protective. We use it exclusively in our shops in City One and City Two, and it's what most pros prefer.
The process involves deep cleaning the light, wetting both the lens and the film, and then carefully squeegeeing it on. A bit of heat from a heat gun helps the film stretch and conform perfectly to all the curves and contours of modern tail lights.
The real wins for using film are:
- Reversibility: This is the big one. If you change your mind, get a "fix-it" ticket, or need to return a lease, you can just peel it right off with a little heat. No harm, no foul.
- Protection: The film acts like a shield. It provides a tough barrier against UV rays, rock chips, and road debris, keeping your factory lenses from getting scratched or faded over time.
- Consistency: A quality film gives you a perfectly even, consistent shade across the entire light. It's a professional look that’s incredibly difficult to match with a spray can.
Exploring Spray Tint
Spray tint is pretty much what it sounds like: a translucent paint in an aerosol can. The process is just like any other automotive spray-painting project. You have to meticulously mask off the car’s body panels, apply several very light coats, and then seal it with a clear coat for shine and durability.
While it sounds simple enough, spray tinting is a high-stakes game. It’s far less forgiving than film. Getting a smooth finish without runs, drips, or blotchy "tiger stripes" takes a very steady hand and a dust-free environment—something most garages aren't.
The biggest issue with spray tint is its permanence. Once it's on and cured, getting it off is a nightmare. It usually involves harsh chemical strippers or aggressive sanding that can easily ruin the plastic lens underneath. It’s a huge risk for a little savings.
Tail Light Tinting Method Comparison
Tail light tinting isn't just a modern fad. It actually has roots in the 1980s JDM import scene, where tuners in Japan smoked their lights to increase longevity, reducing UV-induced yellowing by 60% compared to stock lenses. Fast forward to today, and it's a huge part of a global automotive tinting film market valued at USD 9.3 billion. North America holds a 39.4% share of that market, fueled by demand in places like City One, State. Interest is definitely growing—we've seen searches for "headlight tint City Two" jump 92% since 2022. It's clear drivers want quality results. You can explore more about the tinting film market to see just how big the industry has become.
With all that in mind, making the right choice is crucial. Here's a quick comparison to help you decide which path is best for you.
| Method | Average Cost (DIY) | Skill Level | Durability | Reversibility | Best For |
|---|---|---|---|---|---|
| Tint Film | $30 – $70 | Intermediate | High (3-7 years) | High (Easily Removable) | Leased cars, beginners, and anyone wanting a uniform, protective finish. |
| Spray Tint | $20 – $50 | Advanced | Medium-High (2-5 years) | Very Low (Permanent) | Experienced painters aiming for a permanent, custom-smoked effect. |
| Professional | $100 – $300+ | N/A | Highest (Lifetime Warranty) | High (Done by a pro) | Anyone wanting a perfect, legal, and guaranteed result without the risk. |
As you can see, there are a lot of variables at play. While a DIY project can be a fun weekend challenge, the subtleties of getting a flawless finish—without damaging your lights—are why so many car owners ultimately turn to a professional for car window tinting.
At The Tin Guy, we exclusively work with premium automotive films, like the ones we detail in our guide to window film types and benefits, to guarantee a perfect and legal application every time. Our expertise ensures your vehicle gets the sharp look you want without compromising on safety, quality, or resale value.
Your Essential Toolkit for a Flawless Finish
Any pro will tell you that a great car tint job has less to do with magic and more with preparation. Just like any project on your car, success comes down to having the right tools on hand before you start. Scrambling for a tool mid-application is a recipe for frustration and a botched job.
This checklist covers everything you'll need to apply a vinyl tint film. We strongly recommend vinyl because it gives you that professional, smoked look but is completely reversible if you change your mind or need to sell the car. While you can save a few bucks on some items, skimping on your squeegee or heat gun can quickly turn this into a costly mistake.
Cleaning and Preparation Supplies
I can't stress this enough: prep is 90% of the job. A single speck of dust, a bit of leftover wax, or a greasy fingerprint will show up as an ugly bubble or speck under the film. A perfectly clean surface isn't just a suggestion; it's non-negotiable.
- Isopropyl Alcohol (70%): This is for your final wipe-down. It flashes off quickly and strips away any remaining oils or contaminants, giving the tint's adhesive the best possible surface to grab onto.
- Clay Bar Kit: Before you even think about grabbing the alcohol, a clay bar is your secret weapon. You'd be shocked at the embedded grime—road tar, industrial fallout—that a normal car wash leaves behind. A clay bar pulls all of that out, leaving the surface perfectly smooth.
- Lint-Free Microfiber Towels: Get a small stack of these. You’ll want dedicated towels for cleaning, drying, and the final buff to avoid cross-contaminating your perfectly prepped light.
Application and Shaping Tools
Once your tail lights are surgically clean, it's time to lay the film. This is where a few quality tools really pay for themselves, especially your heat gun and squeegee.
A proper heat gun is what separates the pros from the amateurs, especially on modern lights with complex curves. You might be tempted to use a hairdryer, but it just doesn't provide the focused, consistent heat you need to stretch the vinyl properly without accidentally melting it.
Your squeegee is the tool you'll have in your hand the most. Don't even think about using that cheap, hard plastic one from the hardware store—you're just asking to scratch your brand-new tint.
The single best tip I can give you is to use a squeegee with a soft felt or microfiber edge. It lets you apply firm, even pressure to push out the slip solution and air bubbles without leaving a single mark on the film. It's a small detail that makes all the difference.
Here’s the rest of what you'll need for the application itself:
- Heat Gun: Absolutely essential for softening the film so it can wrap around curves smoothly.
- Felt-Tipped Squeegee: Your go-to for applying pressure and working out bubbles without scratching the film.
- Spray Bottle: This will hold your "slip solution," a mix of water and soap.
- Baby Shampoo or Dish Soap (No Degreasers): You only need a couple of drops in your spray bottle with water. This solution allows you to slide the film around and get the positioning perfect before it tacks down.
- Precision Knife or Utility Blade: A fresh, sharp blade is crucial for getting a clean, perfect cut when you trim the excess film. A dull blade will snag and tear the vinyl every time.
Having this gear laid out and ready to go will make the whole process feel smoother and more controlled. It’s the surest way to get that flawless, blacked-out look you're going for on your car.
Applying Tail Light Tint Film From Start to Finish
Alright, this is where the fun begins. Your lights are clean, your tools are laid out, and you’re ready to give your ride a serious style upgrade. Applying automotive tint film isn't rocket science, but it absolutely demands patience and a steady hand.
We’re going to walk through the same process the pros use, hitting four key stages: the final prep, applying the film with a "wet method," squeegeeing for that perfect look, and using heat to master the curves. Nail these steps, and you’ll end up with a finish you can be proud of.
Meticulous Surface Preparation
You've already done the initial cleaning, but this final prep is what separates a pro job from a DIY disaster. This is what ensures the film’s adhesive gets a perfect grip on the lens, stopping any lifting or bubbling later on. A single speck of dust now will look like a boulder under the film.
First, grab your 70% isopropyl alcohol solution. Give the tail light a good spray and wipe it down with a fresh, lint-free microfiber towel. This gets rid of any oils or fingerprints from handling. Do it twice. Seriously.
Now, it’s time to mix your slip solution. Fill a spray bottle with water and add just two or three drops of baby shampoo or a basic, no-frills dish soap. Give it a gentle shake—you’re aiming for slick water, not a bottle of suds. This solution is the secret sauce that lets you slide the film into the perfect spot.
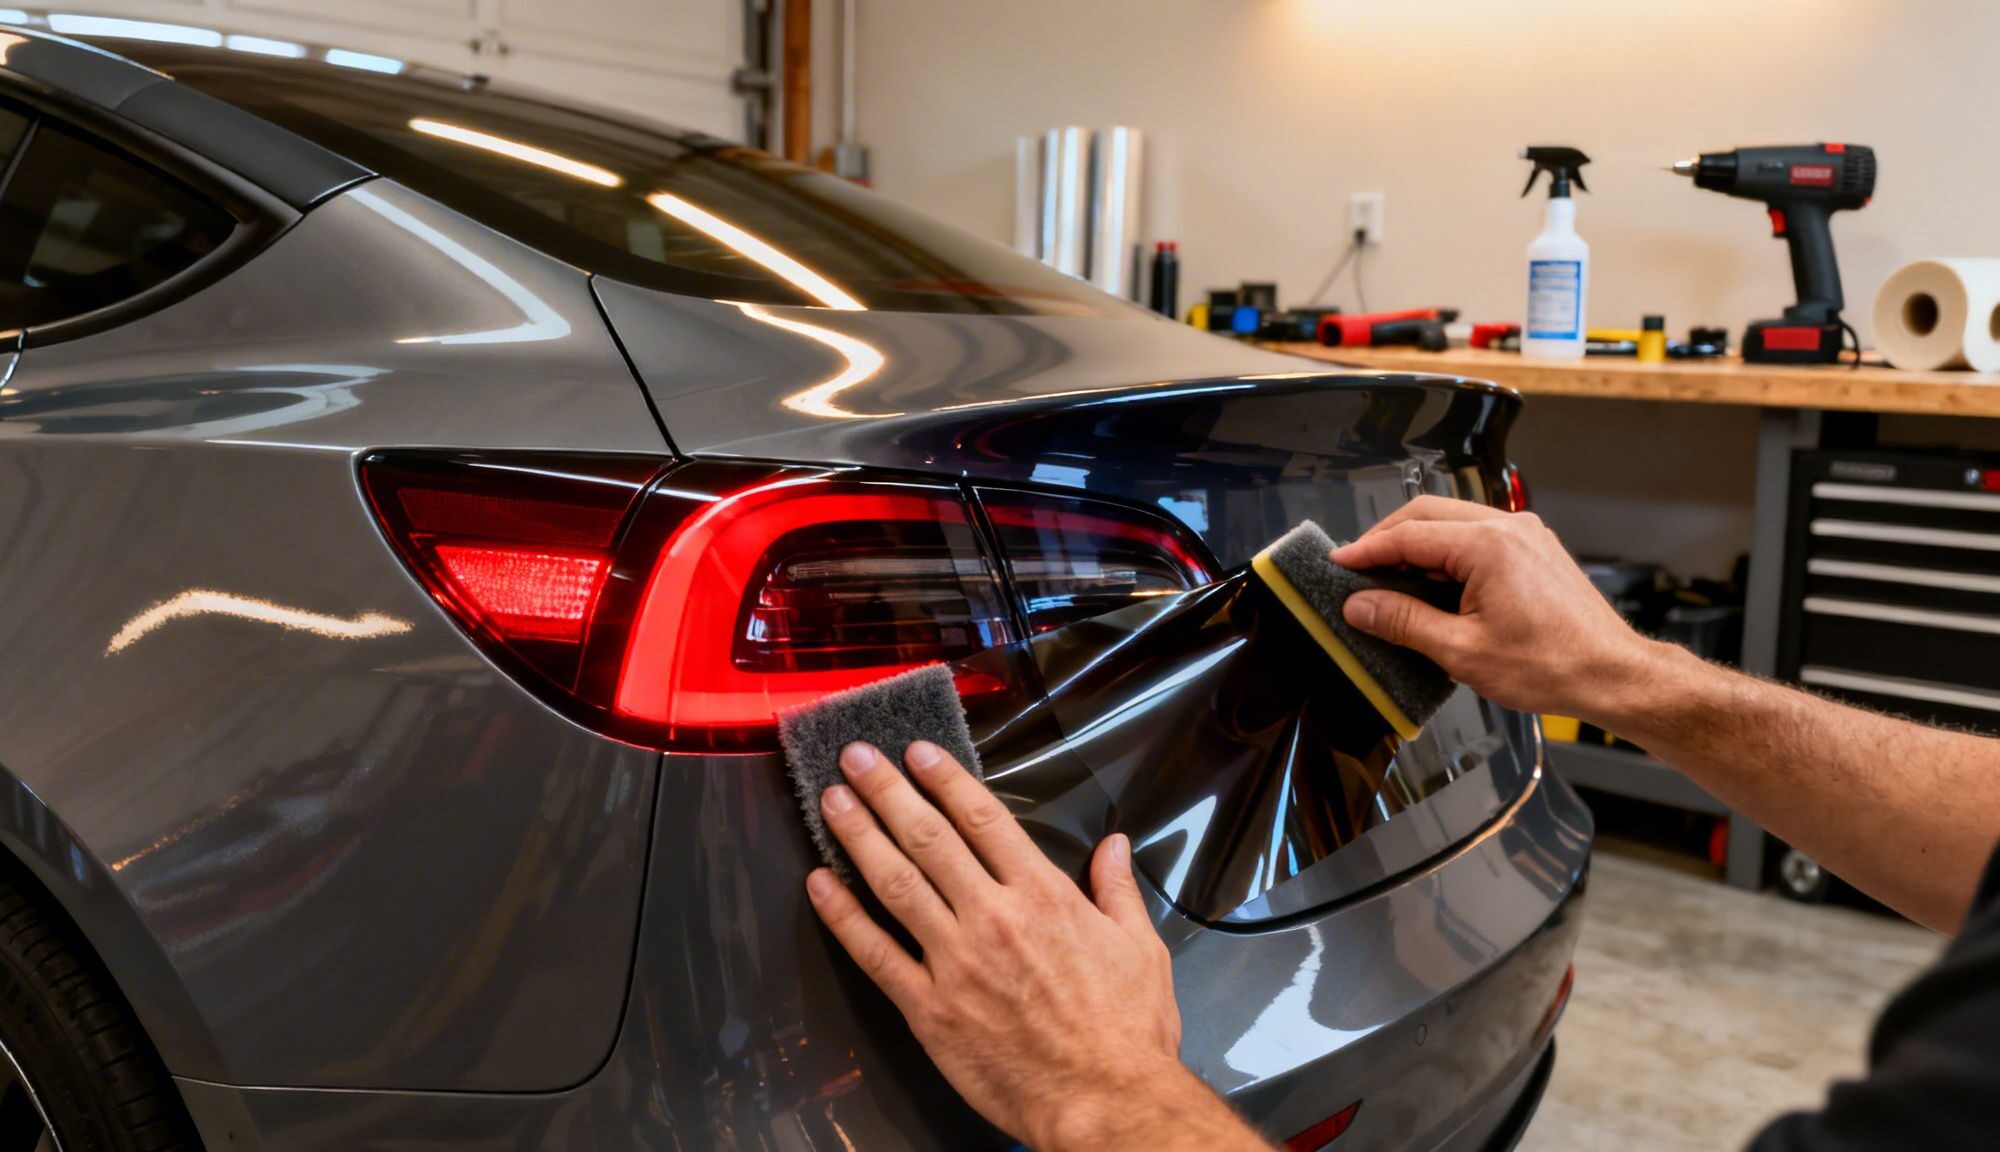
The Wet Method Application
There’s a reason every professional auto tint installer uses the wet method: it's forgiving and it gives you time to get the placement just right. Start by spraying the tail light with your slip solution until it’s literally dripping wet. Don't hold back here.
Next, you'll peel the clear backing from your tint film. As you expose the adhesive, immediately start spraying that side with the slip solution, too. Keeping the adhesive wet is critical—it stops the film from sticking to itself and lets it float on the lens.
With both the light and the film’s sticky side soaked, gently lay the tint onto the tail light. The slip solution lets you slide it around effortlessly. You want to position it with a little bit of extra film hanging over every edge. That overlap is what you'll grab and stretch later.
This quick guide shows the main players in the application process, from your soap solution to the heat gun.

As you can see, each tool has a specific job to do to get that seamless, factory-like finish.
Squeegeeing for a Smooth Finish
Once the film is perfectly aligned, you need to "anchor" it. Using your felt-tipped squeegee, press down lightly on the flattest part of the light, right in the center. This one motion pushes the water out from that spot and locks the film down so it won’t move while you work on the rest.
Pro Tip: Always squeegee from the center out. This is a non-negotiable rule. This technique pushes all the water and trapped air bubbles toward the edges where they can escape. If you squeegee from the edge in, you’re just trapping pockets of water.
Start using firm, overlapping strokes with your squeegee, always working from that center anchor point toward the edges. You’ll see the water being pushed out from under the tint. Be deliberate and consistent with your pressure.
Heat Shaping and Trimming
As you get to the edges, you'll hit curves where the film bunches up into what we call "fingers." This is totally normal, and it's where the heat gun earns its keep.
Set your heat gun on a low or medium setting and always keep it 6-8 inches from the film. Never get closer or stay in one spot for too long—you’ll melt the film or even damage your tail light before you know it. Use a constant, sweeping motion to gently warm up the area with the fingers.
You’ll see the film instantly soften and lay down. While it's warm and pliable, use your squeegee or a gloved hand to gently stretch it over the curve, smoothing the fingers out flat. You might need to make a few passes of heating and stretching. Patience is everything here.
Once the entire surface is smooth and every finger is gone, give the whole light one last, quick pass with the heat gun to help set the adhesive. Finally, grab your precision knife and carefully trim the excess film right along the edge of the tail light. Use the gap between the light and the car's body as a guide for a perfectly straight cut.
Let the tint cure for at least 48 hours before you even think about washing the car.
Troubleshooting Common DIY Tinting Mistakes
Even when you follow every step perfectly, a DIY tail light tint can throw you a curveball. The real difference between a pro-looking finish and a weekend of frustration is knowing how to handle these little issues as they arise. Consider this your field guide to fixing the most common headaches, like bubbles, lifting edges, and those stubborn "fingers."
Don't let a few imperfections make you want to rip it all off and start over. The good news? Most of these are fixable if you catch them early and know the right moves.
Distinguishing Good Bubbles from Bad Bubbles
First things first, let's talk bubbles. You're going to see them, but it's crucial to know which ones are friends and which are foes. Right after you lay the film, you'll probably notice some small, cloudy pockets under the surface. These are just water bubbles from your slip solution, and they're a normal part of the process.
Leave them alone! These tiny moisture pockets will work themselves out over the next few days, evaporating right through the film as it cures. Trying to force them out now will only stretch or crease the film.
The bubbles you need to deal with are the ones filled with air or, even worse, debris.
- Air Bubbles: These usually look like clear pockets of trapped air and are often bigger than water bubbles. You can typically work these out by gently pushing them toward the closest edge with a felt-tipped squeegee.
- Dirt/Debris Bubbles: Here's the real enemy. You'll know it's a debris bubble because you can see a tiny, distinct speck of lint or dust right in the center. Unfortunately, there's only one fix for this: you have to carefully peel back that section of film, use the very tip of your knife to pick the speck out, re-spray the area, and squeegee it down again.
Taming Fingers and Peeling Edges
"Fingers" are those annoying little tentacles of film that pop up and refuse to conform to a curved surface. This is where your heat gun is your best friend, but you have to use it correctly. A lot of first-timers make the mistake of using too much heat, which will quickly melt or warp the film.
The trick is to use a low heat setting and keep the gun moving about 6-8 inches from the light. Warm the area just enough to see the fingers start to relax and lay down. As soon as they do, use your gloved thumb to smooth the now-pliable film onto the curve. You may need to repeat this gentle heat-and-press process a few times until they're all gone.
What if you notice edges peeling up a day or two later? This is almost always caused by an imperfectly cleaned surface or not using enough heat to set the edge during the install. You can often salvage it by carefully lifting the edge, cleaning underneath it with an alcohol wipe, and using the heat gun to warm the film and re-activate the adhesive as you press it down firmly.
This really highlights one of the biggest challenges of DIY tinting. Getting a permanent, seamless bond on complex curves is a skill that professional automotive tint installation specialists, like our teams in City One, State, and City Two, State, have mastered over thousands of vehicles. While these tips can save a project, they also show the level of precision that separates a good-enough job from a flawless one—and that's the finish a professional service delivers every time.
Navigating Tail Light Tint Laws in Georgia
Before you go all-in on that custom, blacked-out look for your tail lights, we need to talk. Here in Georgia—especially in Cherokee, Cobb, and Fulton counties—getting this wrong isn't just a style mistake. It can lead to tickets, failed inspections, and a whole lot of frustration you just don’t need.
Getting the look you want for your car while staying on the right side of the law is a balancing act, but it's one we've perfected over the years.

Unlike car window tint, Georgia’s rules for tail lights aren’t about a specific percentage. Instead, the law focuses on pure, simple visibility. Your brake lights and turn signals must be clearly visible from 300 feet away, and the original red color can't be washed out or changed. It has to look like a red light, period.
VLT and Real-World Safety
This isn't just about avoiding a ticket. Excessively dark tint is a serious safety hazard. Think about it: it drastically cuts down how well other drivers can see your brake lights, especially at night or in heavy rain. That delay in reaction time for the driver behind you is often the difference between a close call and a rear-end collision.
It's crucial to understand all the regulations for your car's modified vehicle lighting systems, not just the tint itself.
If you don't comply, you could be looking at:
- Costly Fines: A citation for illegal tail light tint can set you back a pretty penny.
- Failed Inspections: Your car will fail its annual safety check, and you'll be forced to remove the tint anyway.
- Accident Liability: If your tinted tail lights are found to be a factor in an accident, your liability could increase significantly.
The Pro Choice vs. The DIY Gamble
We see the results of DIY jobs all the time. The numbers don't lie: improper tail light tinting is a factor in 14% of nighttime visibility citations in Georgia, with fines climbing from $150 to $500. On the flip side, professionally installed films that meet the 70-80% VLT range pass inspection 98% of the time.
It's no wonder that while the tint market grows, surveys show that 72% of DIY installers end up regretting it. They face issues like bubbling, peeling, and a hazy look that actually makes their lights less effective.
Choosing a professional installer like The Tin Guy takes all the guesswork out of the equation. Our automotive tint technicians are masters of their craft and know Georgia's state and local regulations inside and out. We make sure your car gets the style you want without compromising on safety or legality.
We only use high-quality automotive films designed to deliver that perfect smoked look while allowing the light to function exactly as the manufacturer intended. For a complete picture of vehicle regulations, you can also read our in-depth guide on Georgia's specific automotive window tinting laws. This ensures your entire car is compliant for a completely worry-free driving experience.
When to Trust the Professionals
So, you’ve seen what it takes to tint your own tail lights. We've gone through the steps, the common slip-ups, and even the legal side of things. It’s a project that demands a seriously steady hand and a whole lot of patience.
While there's a certain pride that comes with a job you did yourself, it's worth taking a moment to think about the flip side. A single speck of dust trapped under the film, one small slip with the heat gun, or a crooked cut can mean you're right back at square one. All that time and material, wasted—and you're left with a look that just doesn't hit the mark.
This is exactly why so many car lovers decide to hand the keys over to a pro. The headaches of bubbles, peeling edges, and the risk of scratching your factory lenses all but disappear when you have an experienced technician handling the job.
The Guarantee of a Flawless Finish
For drivers in City One and City Two, a professional car tint isn't just about saving time; it's about getting a result you can count on. You’re swapping the gamble of a DIY kit for a perfect finish, backed by years of hands-on experience. At The Tin Guy, we are experts in automotive tinting, and we know what it takes to get it right.
A professional automotive tint installation means no bubbles, no peeling, and perfect alignment around every complex curve of modern tail lights. It's the difference between an 'okay' job and a showroom-quality finish that lasts for years.
Beyond just a perfect application, letting a pro handle it comes with a few key advantages that a DIY kit just can't touch:
- Premium Materials: We work with high-grade ceramic window tint and other top-tier automotive films. These offer far better clarity, toughness, and UV protection than the stuff you'll find on a store shelf.
- Legal Compliance: Our installers are well-versed in Georgia’s vehicle laws. We make sure your tail lights look sharp while staying 100% street-legal and safe.
- Lifetime Warranty: We stand behind our work. All our automotive tinting comes with a lifetime warranty that covers bubbling, peeling, and fading. That’s a level of security no DIY project can offer.
Of course, tint is just one piece of the puzzle. Car care has many areas where an expert's touch makes all the difference; for example, professional graphene coatings for cars offer next-level paint protection and an incredible, long-lasting shine.
Ultimately, choosing a professional isn’t just an alternative; it’s the best way to get a durable, flawless, and worry-free result.
Ready for a perfect, legal, and warrantied tint job? Don't risk the hassle. Schedule your automotive tint installation with The Tin Guy today and let our experts in City One and City Two give your car the premium finish it deserves.