
You're probably looking at a car with tint that has gone bad in the exact way Georgia cars tend to go bad. The film is bubbling, turning purple, cracking at the edges, or hazing up just enough to make afternoon driving annoying. On a rear window, it's worse. The tint starts breaking apart in thin layers, and every instinct says to grab a blade and scrape harder.
That's where most DIY jobs go sideways.
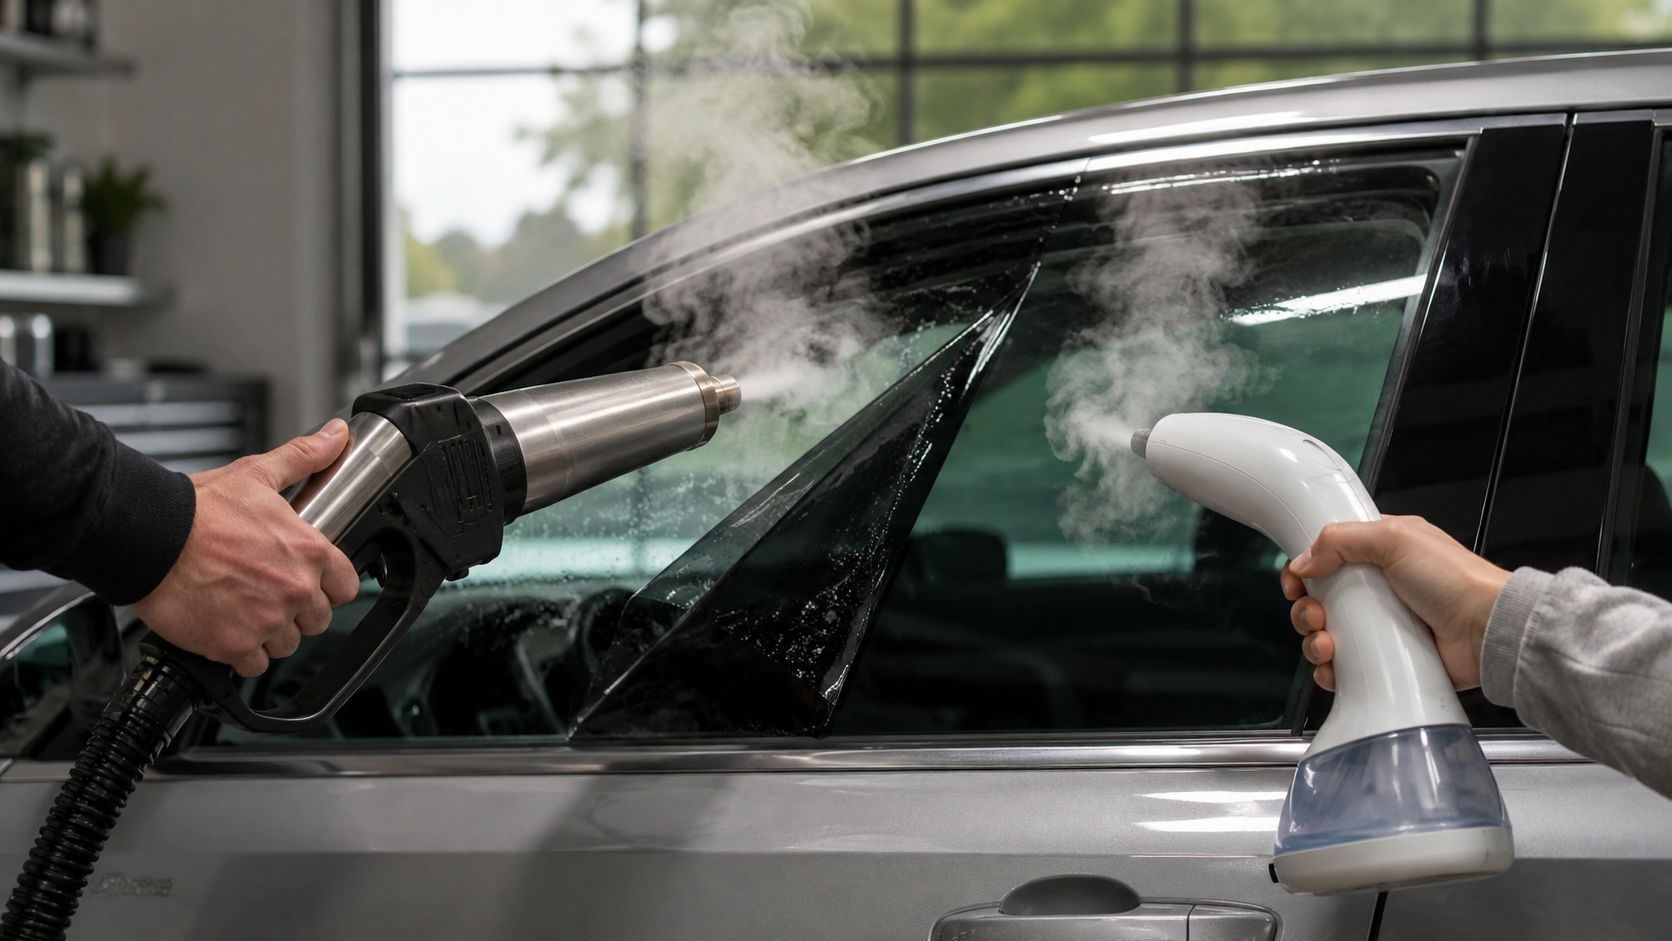
Around Woodstock, Kennesaw, and Canton, old automotive tint gets baked hard by heat and sun. The tool matters, but the actual job is bigger than the steamer itself. You're not just trying to lift film. You're trying to remove aged adhesive, protect defroster lines, avoid soaking interiors, and leave the glass clean enough for new tint. That's why the best steamer for window tint removal isn't just the hottest machine on a spec sheet. It's the one that gives you the cleanest release with the least cleanup and the lowest risk.
Here's the quick comparison before we get into the actual process.
| Feature | Professional Steamer (e.g., Jiffy J-2000) | Consumer Garment Steamer |
|---|---|---|
| Steam output | Stronger, more consistent for automotive adhesive work | Often inconsistent once the job runs long |
| Heat capability | Built for hotter steam and stubborn film | Usually fine for fabric, often weak on baked tint |
| Tank size | Better for full-car work without constant stops | Smaller tanks, more refills |
| Hose and reach | Better control around side and rear glass | Can feel short or awkward in tight interiors |
| Durability | Made for repeated heavy use | Better for occasional household use |
| Best use case | Old tint, rear glass, full removals | Small jobs, lighter film, limited DIY use |
| Main drawback | Higher upfront cost, bulkier unit | Slower, more residue, more frustration |
Why Steam Is the Secret to Removing Old Window Tint
You see it all the time on an older car in North Metro Atlanta. The film is purple, the edges are curling, and the owner figures a scraper and a little patience will handle it. Then the top layer comes off, the glue stays on the glass, and a one-hour plan turns into a half-day cleanup.
Steam changes that outcome because it works on the part of the job that causes the trouble. The true fight is usually not the film itself. It is the adhesive that has been baked into the glass by years of Georgia heat.

A good steamer puts heat and moisture into that glue layer at the same time. That matters more than people expect. Dry heat can warm the film, but steam is often better at getting old adhesive to release without forcing you into constant scraping.
That wider margin helps most on rear windows. Defroster lines do not give you much room for mistakes, and old tint on rear glass is usually the job that exposes a weak tool or a rushed technique. I have seen plenty of side windows come off with basic heat, but the back glass is where steam earns its keep.
Why dry heat falls short on older tint
Heat guns still have a place. On newer film or a lightly failed side window, they can move fast in the right hands. The trade-off is control. Too much dry heat in one spot can make old glue gummy, stringy, or stubborn enough that the film tears before it lifts cleanly.
Steam is slower in some cases, but it is often cleaner. For a DIYer, that usually means fewer blade passes, less adhesive left behind, and less risk of turning tint removal into a glass restoration job.
What steam does better in the real world
On cars around Woodstock, Kennesaw, and Canton, steam tends to improve the parts of the job that people do not think about until they are already stuck:
- It softens adhesive more evenly across the glass, which helps the film release in larger sections
- It lowers blade use on sensitive areas like rear defrosters and tight edges
- It cuts cleanup time when the goal is clean glass for re-tint, not just getting the old film off
- It gives DIYers a better chance of finishing the job without soaked door panels, scratched glass, or a layer of glue haze left behind
That last part is the hidden job. Removing tint is only step one. The desired end-result is clear glass, no damage, and no leftover mess that shows up under new film. Steam gives you a better shot at that, but the tool alone does not guarantee it. Technique, patience, and the condition of the old tint still decide whether the job stays manageable or turns ugly fast.
Professional vs Consumer Steamers A Detailed Comparison
A DIY tint job usually goes sideways on the second window. The first panel gives people confidence. Then the steam drops off, the film starts tearing into thin strips, and the demanding work begins. Not removing the tint. Cleaning the glue, protecting the defrosters, and getting the glass clean enough for a new install.

That is the difference between a professional steamer and a household unit. The better machine does not just make more steam. It reduces rework.
What separates pro units from household units
| Feature | Professional Steamer (e.g., Jiffy J-2000) | Consumer Garment Steamer |
|---|---|---|
| Heat consistency | Built to keep steam output stable during longer jobs | Output often drops during extended use |
| Water capacity | Better for multiple windows in one session | Frequent refill interruptions |
| Build quality | Commercial use, tougher hoses and fittings | Household durability |
| Attachments | Better suited to controlled automotive work | Usually general-purpose heads |
| Removal outcome | Better chance of larger film release and less fighting | More likely to require repeated passes |
In shop use, Jiffy comes up again and again because it holds temperature, recovers fast, and keeps producing usable steam through a full car. In discussions among professional tinters, the Jiffy steamer is cited over and over as the tool they trust for tint and vinyl removal. That reputation is more credible than a hard percentage pulled from a forum thread, and it matches what I see in real jobs around North Metro Atlanta.
The temperature question matters, but the exact number gets overstated online. Consumer posts often throw around 400 degree figures without solid technical backing for tint removal. What matters on the glass is sustained heat at the head, steady moisture, and enough output to keep old adhesive soft while you lift the film. A steamer that spikes hot for a moment and then fades will still make the job harder.
Where consumer steamers fall short
A consumer garment steamer can work on the right job. That usually means lighter film, side glass, and adhesive that has not baked for years under Georgia sun. On old rear windows, especially cars that have spent their life parked outside, cheap units show their limits fast.
The usual failure points are predictable:
- Steam looks decent at startup but weakens once the tank and hose heat cycle catches up
- Short run time breaks your pace and lets adhesive cool between passes
- Poor recovery forces you to hover longer in one area
- Uneven release leads to torn film and more glue left on the glass
That last point is where the hidden job shows up. Anyone can pull at purple, bubbling film. The harder part is finishing with clean glass, intact defroster lines, dry interior panels, and no glue haze waiting to show under fresh tint.
If you want a broader walkthrough on the full process, this guide on how to remove car window tint safely covers the removal side in more detail.
What I'd actually choose by window type
Rear glass gets the pro unit. No question. Defroster lines are expensive to damage, and weak steam makes people compensate with blades, fingernails, and too much pulling.
Side windows give you more room to work. A decent consumer steamer may be enough if the tint is newer and you only have one or two windows to do. Even then, expect more passes and more cleanup.
For full-car removal in Woodstock, Kennesaw, or Canton, a commercial-style steamer usually saves time overall because it cuts down the adhesive fight after the film comes off. That is why Jiffy stays the benchmark in so many shops. It is not magic. It just keeps doing the part that matters, consistent steam for long enough to get the film off cleanly and keep the rest of the job under control.
How to Remove Window Tint with a Steamer Step by Step
Saturday afternoon in North Metro Atlanta, the car is parked in the driveway, the film is already bubbling from Georgia heat, and the first instinct is to start pulling. That is usually where a clean job goes sideways. Good tint removal comes from controlling heat, moisture, and timing all the way through adhesive cleanup.

A visual walkthrough helps before you start. This embedded demo shows the kind of controlled pace you want on glass:
If you want a broader removal overview before you begin, this guide on how to remove car window tint safely covers the process in more detail.
Step 1. Protect the interior first
Put towels along the door panel, rear deck, speaker areas, and any trim that can hold moisture. Steam is gentle on glass, but the full job still creates runoff, loosened glue, and dirty wipe-downs.
Set out your tools before you heat anything. That usually means plastic scrapers, microfiber towels, a spray bottle, glass cleaner, and adhesive remover. On side glass, some people use a razor with care. On rear glass with defroster lines, I would stay much more conservative.
Step 2. Start with a small test area
Pick a corner and heat a section about hand-size. Keep the nozzle close enough to warm the film evenly, but do not press it against the glass or sit in one spot too long.
Then try to lift an edge with your fingernail or a plastic blade. If the film resists, keep steaming. Forcing a dry edge is what turns old tint into little flakes, and flaky tint adds a lot of cleanup time.
Step 3. Peel with the steam still on the film
This part matters more than the steamer brand. Keep steam moving just ahead of the section you are pulling so the adhesive stays soft while the film releases.
Use slow, even tension. Sharp yanks usually separate the top layer from the glue layer, especially on old purple film that has baked for years in Georgia sun. Once that happens, the hidden job starts. You are no longer removing tint. You are scraping glue and film fragments off heated glass.
Step 4. Finish one window before jumping to the next
In our shop, we do not peel a whole car first and come back for glue later unless the film is releasing unusually clean. We mist the glass right away and keep the residue damp while we work. That simple habit prevents the adhesive from tightening back onto the glass.
A good workflow looks like this:
- Steam and peel one section at a time
- Mist exposed adhesive as soon as the film lifts
- Wipe or scrape residue before it dries
- Complete the window, then move on
DIY jobs often get harder because the film comes off, the person feels like the hard part is done, and the glue sits there drying while they start another window.
Step 5. Remove leftover adhesive without getting aggressive
Steam helps, but it does not guarantee a glue-free finish. Some films release cleanly. Others leave a smeared layer that needs chemical help and patience.
A dedicated product like Tint Off can work well for stubborn residue, as shown in this adhesive cleanup demonstration. Apply your remover, give it a short dwell time, then wipe, scrub lightly, or use the right scraper for that glass. Rear windows need the most care because defroster lines are easy to damage with too much pressure or the wrong blade.
Short passes beat aggressive scraping.
Step 6. Check the glass from more than one angle
Glue haze hides indoors and shows up later in direct sun. Look from inside and outside. Check along the edges, around the dot matrix, and across rear defroster lines where residue likes to hang on.
If the car is getting retinted, this inspection decides how the new film will look. Clean glass gives you a smooth result. Missed adhesive gives you contamination, haze, and callbacks.
The True Cost of DIY Tint Removal
DIY looks cheaper on paper because the calculation often only considers the tool. It doesn't count the whole job. That's where the math changes.
The hidden cost starts with time. Even when everything goes right, removing tint from an entire car isn't quick. You're setting up the vehicle, heating and peeling each window, managing runoff, cleaning glue, and checking for missed residue in changing light. If one rear window turns into a glue-heavy mess, your “simple afternoon project” is gone.
What people forget to include
A real DIY budget usually includes more than the steamer itself:
- Protective materials like towels, gloves, and trim coverage
- Scrapers and blades suited to the right glass surfaces
- Adhesive remover for the residue phase
- Glass cleaning supplies for final prep
- Your time which is the one line item often assumed to be free
Then there's the risk side. Rear windows are where expensive mistakes happen. Defroster lines are delicate. Trim can stain. Interior panels don't love drips from chemical cleaners. If the tint is old and brittle, the tool cost becomes the cheapest part of the day.
The outcome is the real price
The question isn't just, “What does the steamer cost?” It's, “What will the finished glass look like, and what happens if I botch it?”
That's why it helps to compare your removal decision against the bigger picture of vehicle film investment. If you're already thinking about replacing old tint, reviewing current car tint cost options gives you a better sense of whether it makes sense to spend your weekend removing bad film yourself or to pay for a clean reset and move straight into new tint.
Practical rule: DIY makes the most sense when the film is cooperative. It stops making sense when you're spending hours to avoid a service that would leave the glass cleaner and the risk lower.
In Woodstock, Kennesaw, and Canton, the Georgia climate adds one more wrinkle. The hotter and older the tint, the less predictable the removal. That uncertainty is the part most DIY budgets leave out.
When to DIY and When to Call a Professional
This call comes down to film condition, window type, and your tolerance for cleanup work. Not every car needs shop removal. Not every car should be a home project either.
DIY makes sense in a few situations
If your tint is on the newer side, still flexible, and mostly failing at the edges instead of crumbling across the whole window, a careful DIY attempt can be reasonable. Side windows are the friendliest place to try it because access is better and the consequences are lower.
DIY is the better bet when:
- The problem is limited to side glass
- The film still peels in larger sections
- You already have proper tools and a place to work
- You're patient enough to finish glue cleanup fully
If that sounds like your vehicle, a good steamer and a slow hand may get the job done.
A shop is the smarter move when the tint is old or the glass is sensitive
Rear windshields change the equation. So does purple, brittle film that has spent years in Georgia sun. In Woodstock, Kennesaw, and Canton, that's common. The film often separates into layers, and the adhesive underneath turns into the main job.
Call a professional when:
- The rear window has defroster lines you can't afford to damage
- The tint shreds instead of peeling
- The glass is curved or awkward to access
- The vehicle is high-value and you don't want trial-and-error on it
- You want new tint installed soon after removal
Think in terms of outcome, not effort alone
A lot of people ask for the best steamer for window tint removal when the essential question is whether they should be doing the removal themselves at all. That's not defeatist. It's practical.
On one car, a steamer turns a rough window into a clean peel. On the next, the same approach leaves you chasing glue around a rear windshield for hours. Tool choice matters, but the condition of the film matters more.
If the tint is failing in thin, dusty layers, you're no longer buying a tool. You're buying yourself a cleanup project.
The safest DIY jobs are simple side windows on ordinary daily drivers. The riskiest jobs are rear glass and heavily baked tint. Many in North Metro Atlanta don't mind doing work. They mind doing work twice. That's why older automotive tint often ends up being a professional removal even when the owner started by shopping for tools.
Why North Atlanta Chooses The Tint Guy for Tint Removal
For drivers in Woodstock, Kennesaw, and Canton, the appeal of professional removal is simple. It takes the hardest part of the job off your plate. No guessing on steam output. No experimenting on rear defroster lines. No finding out halfway through that the film comes off but the glue doesn't.

A good tint removal service isn't just selling labor. It's selling a finished surface. That means the glass is clean, the trim is respected, and the vehicle is ready for whatever comes next. If that next step is fresh film, the advantage is even bigger because proper prep is everything.
Why local drivers care about the finish
North Atlanta vehicles deal with long sun exposure, sticky interiors, and old film that tends to fail ugly. The owner usually wants one of two things. Either they want the bad tint gone without damage, or they want it removed and replaced with something modern that performs better in heat.
That second group usually searches for a shop that can handle both removal and replacement well. If that's where you are, looking at professional window tinting near me makes more sense than buying a household tool and hoping the cleanup phase goes smoothly.
Why the process matters more than the machine
The best result doesn't come from steam alone. It comes from using the right heat, the right pace, the right adhesive cleanup method, and the judgment to know when to stop pulling and rework the section. That's the part most online buying guides miss.
For car owners in Woodstock, Kennesaw, and Canton, the value of a professional shop is that the outcome is predictable. Your rear glass still works. Your side windows are clean. Your new tint doesn't go onto contaminated glass. That's the difference between getting the film off and finishing the job right.
Final Recommendations and Your Next Steps
If you only want the short answer, here it is. The best steamer for window tint removal is a professional-grade unit that can maintain strong, consistent heat through the whole job. This typically means a commercial-style steamer, not a bargain garment unit.
But that's only half the answer.
The issue is whether the car in your driveway is a good DIY candidate. If it's a simple side-window job and the film isn't falling apart, a careful DIY removal can work. If it's old rear glass tint on a vehicle that has lived through years of Georgia heat, the smarter choice is usually professional removal. That's especially true in Woodstock, Kennesaw, and Canton, where sun-baked automotive film tends to fight back.
If you're removing old tint because you want better comfort, less glare, and cleaner looks, this is also the right time to upgrade. Fresh ceramic tint on properly cleaned glass is a much better long-term move than living with failing film or rushing a messy removal.
The bottom line is simple. Steam is the right method for many automotive tint removal jobs. A strong steamer helps. Good process matters more. And when the tint is old, brittle, or sitting on rear glass, paying for an expert result is usually cheaper than paying with your weekend, your patience, and your risk.
If you're in Woodstock, Kennesaw, or Canton and want a clean, damage-free tint removal with the option to upgrade to new film right after, contact The Tint Guy. They handle the hard part correctly, leave the glass ready for the next step, and help North Metro Atlanta drivers replace failed tint with a better solution for Georgia heat.