
Sooner or later, every car window tint reaches the end of its life. The process usually involves heating the film to soften up that old adhesive and then carefully peeling it away. Whether your automotive tint is starting to bubble up, peel at the edges, or you're just ready for a change, it helps to think of this not as a chore, but as the first step to a major upgrade for your car, truck, or SUV.
Why and When to Remove Your Car Window Tint
Before you grab a scraper, let's talk about the common reasons car owners decide it's time for the old film to go. Viewing this project as a necessary step toward a better driving experience can make all the difference. Getting rid of that old, failing tint clears the way for a modern, high-performance automotive film that will completely transform how your vehicle looks and feels.
The most obvious cue is when the tint just doesn't look good anymore. Over time, the sun's heat, UV rays, and simple aging break down the film's adhesive, leading to some pretty clear signs of wear and tear.
- Bubbling and Blistering: This is a classic. Trapped air or moisture creates those ugly bubbles that obstruct your view and scream "adhesive failure."
- Peeling Edges: You'll see the film start to lift at the corners and along the edges, getting caught on window seals and looking sloppy.
- Color Fading: Many lower-end dyed films famously turn a strange purple or brown color over the years, which really cheapens your vehicle's appearance.
- Reduced Clarity: Sometimes a hazy or cloudy look develops, making it harder to see clearly, especially when driving at night or in bad weather.
If you're seeing these issues, you might want to check out our guide on what causes window tint to peel and what to do about it.
Legal Compliance and Safety
Another huge reason for car tint removal is staying on the right side of the law. Automotive tint regulations, like Georgia's 32% light transmission rule, are no joke. A tint that's too dark can earn you a hefty ticket and a failed vehicle inspection, forcing you to remove it anyway.
Here's a reality check: industry data shows fading affects 60% of automotive tints after just 5-7 years. With 15 states updating their tint laws since 2020, what was legal a few years ago might not be today.
Ultimately, removing old or illegal automotive tint isn’t just about fixing a problem—it’s about creating an opportunity. It clears the way for a professional installation of advanced ceramic window tint, offering superior UV protection, significant heat rejection, and a flawless, long-lasting finish for your car.
Upgrading for Better Performance
Sometimes, you just want something better. Automotive tint technology has come a long way, and older films simply can't hold a candle to the performance of modern ceramic or carbon tints.
If your current film isn't cutting it on the heat reduction or UV protection front, removing it is the only way to upgrade your car's comfort and safety. This is especially true for car owners in sunny spots like Kennesaw and Marietta, where serious heat rejection is a necessity, not just a nice-to-have.
Getting Your Tint Removal Toolkit Ready
Let's be honest: the difference between a smooth car tint removal and a frustrating, glass-scratching nightmare comes down to one thing—preparation. Before you even think about peeling that first corner, taking a few minutes to get all your gear in one place will save you a world of hurt. Trust me, you don’t want to be making a frantic run to the auto parts store with a half-peeled, glue-smeared window.
Having the right tools doesn't just make the job easier; it's your best defense against damaging your vehicle. The end goal is a perfectly clean, residue-free car window, ready for a fresh start—maybe even an upgrade to a modern, high-performance film. If you're curious about what's out there, you can explore the different automotive window film options and their benefits to see what might be next for your car.
Before we dive into the specific methods, let's build your toolkit. Getting this right is half the battle.
Essential DIY Tint Removal Toolkit
Here's a detailed checklist of everything you'll need to tackle this automotive project like a pro. Don't skip the small stuff—it often makes the biggest difference.
| Category | Essential Items | Pro Tips |
|---|---|---|
| Cleaning & Prep | Spray Bottle, Dish Soap | A simple mix of water and a few drops of soap is your best friend for lubrication. |
| Plenty of Microfiber Towels | You can never have too many. Use them for cleaning, wiping, and protecting your car's interior. | |
| Scraping Tools | Plastic Razor Blades | CRITICAL: Never use metal razors. They will scratch your glass and destroy defroster lines. |
| slim glass scraper | A dedicated scraper gives you better leverage and control for stubborn glue spots. | |
| Method-Specific | Heat Gun or Fabric Steamer | A heat gun offers focused power, while a steamer is gentler and great for dissolving adhesive. |
| Adhesive Removal | Adhesive Remover (Citrus-based), Rubbing Alcohol | Have a dedicated solvent on hand. Some glues are tougher than others. |
| #0000 Super-Fine Steel Wool | Use this only as a last resort on tough spots, with plenty of soapy water. Test it first! | |
| Protection | Trash Bags, Painter's Tape | For catching old film and protecting your car's door panels and dashboard from drips. |
| Safety Gear | Heat-Resistant Gloves, Safety Glasses | Non-negotiable. Protect your hands from heat and your eyes from chemical splashes. |
With these items laid out and ready to go, you're setting yourself up for a much smoother process from start to finish.
Core Supplies for Any Method
No matter which removal technique you settle on, a few items are absolutely essential. Think of these as the universal constants of car window tint removal.
You'll be leaning heavily on a spray bottle filled with soapy water. This simple solution acts as a lubricant, helping your scraper glide over the glass and keeping the adhesive wet and workable.
A healthy stack of microfiber towels is a must. You'll need them for everything from wiping away gooey residue to protecting your car's door panels and dashboard from moisture and cleaning solutions.
And I'll say it again: plastic razor blades. Metal will permanently scratch your glass and can sever the delicate defroster lines on your rear window in an instant. Plastic blades are tough on adhesive but gentle on glass, making them the only smart choice for any automotive glass.
Method-Specific Tools
Once you have the basics, your toolkit will need a couple of specialized items depending on whether you're using heat or steam. These are the two methods we see the most success with for DIY car projects.
If you're using a heat gun: You need a proper heat gun, not a hairdryer. Hairdryers just don't produce the consistent, high-level heat required to soften old, baked-on automotive tint adhesive effectively. A real heat gun gives you the control to warm the film just enough to release its grip.
If you're using a steamer: A garment or fabric steamer is perfect for this job. It bathes the window in hot, moist air, which is fantastic for penetrating the film and breaking down the glue underneath. It's also a bit more forgiving than a heat gun, as the risk of overheating and damaging the auto glass is much lower.
Pro Tip: When choosing a steamer, look for one with a long hose and a wide nozzle. This setup makes it so much easier to get even coverage across the entire car window, especially in those tight corners, without having to be a contortionist.
Tackling the Leftover Glue
Getting the film off is just phase one. Phase two is dealing with the sticky, messy adhesive it leaves behind. This is where patience really pays off.
Your main weapon here will be a good adhesive remover. Citrus-based cleaners work well and are less harsh, but sometimes you need to bring out a dedicated automotive solvent. Rubbing alcohol is also great for cutting through the last of that sticky film.
For really stubborn patches, #0000 super-fine steel wool can be a lifesaver. Dunk it in your soapy water and gently scrub the glue. Be extremely careful and always test it on an inconspicuous corner of the glass first to ensure it doesn't haze the surface.
Finally, don’t forget about your own safety. You’re working with chemicals and high heat. A pair of heat-resistant gloves is a must when using a steamer or heat gun, and safety glasses will protect your eyes from any unexpected splashes or steam.
Using a Heat Gun for Clean Film Removal
There's a good reason the heat gun method is a favorite in professional auto tint shops: when you do it right, it works incredibly well. The whole idea is to use controlled heat to soften the tint's adhesive, which weakens its grip on the auto glass.
This approach lets you peel the film off cleanly, sometimes in one single, satisfying sheet. The huge benefit here is that it dramatically cuts down on the amount of stubborn, sticky gunk left behind. It transforms a potentially frustrating job into a methodical process.
Setting Up for Success
Before you even think about plugging in that heat gun, you need to prep your car's interior. This is a step you absolutely can't skip.
Start by covering everything up. Lay down plastic sheeting or large trash bags over the door panel, your dashboard, and the seats. Use painter's tape to hold the plastic in place and to carefully mask off any rubber seals or plastic trim around the window's edge.
This isn't just about being neat—it's about protecting your car. Soapy water and adhesive residue can easily drip down and stain your upholstery or, even worse, damage the electronics inside your door panel. Trust me, spending a few minutes on prep can save you hours of cleanup or expensive repairs down the road.
Mastering the Heat and Peel Technique
With your car's interior protected, it's time to get down to business. Set your heat gun to a low or medium setting. You’re looking for a temperature range of about 150-200°F. You're not trying to cook the glass, just gently warm up that old adhesive.
Hold the heat gun about 6 to 8 inches from the glass and keep it moving in a slow, sweeping motion. Whatever you do, don't let the heat sit in one spot for too long. That's how you create a thermal shock and end up with a cracked window.
Expert Insight: The name of the game is even heating. I always start by focusing on one corner of the car window. As you heat it, you’ll notice the film's texture change just a bit. That's your sign that the glue is starting to let go.
Carefully use a plastic razor blade to lift that heated corner. Once you have a small flap you can grab with your fingers, you can put the blade down. Now the real skill comes into play.
As you begin to pull, keep applying heat just ahead of the area you're peeling. Use a slow, steady hand to peel the film back at a sharp 45-degree angle. The biggest mistake people make is yanking or pulling too fast. Old, brittle automotive film will just tear into a million tiny, frustrating pieces. Patience is everything here.
The infographic below breaks down the essential tools you'll need for this job, from the removal gear to safety and cleaning supplies.
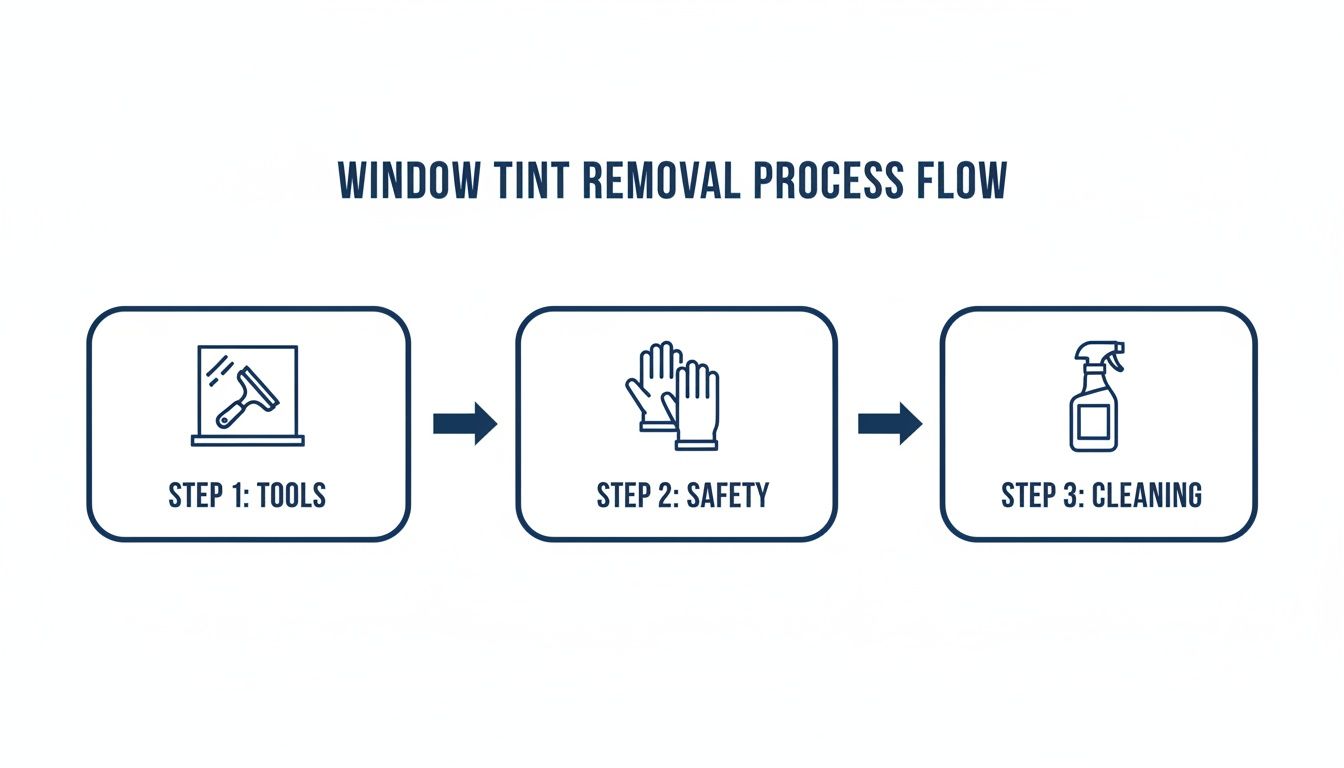
This visual is a great reminder that a successful tint removal project is all about having the right gear for every stage, from start to finish.
If the film rips—and it might—don't panic. Just reheat the edge of the torn section and use your plastic blade again to lift a new starting point. The goal is a slow, consistent pull coordinated with steady heat.
The Final Cleanup
Even with a perfect peel, you'll almost always have some adhesive residue left on the glass. This is completely normal.
To get rid of it, spray the glass liberally with your soapy water solution. Let it sit for a minute; this will help break down the leftover glue.
Next, take your plastic razor blade and hold it at a flat angle to the glass. Start scraping the residue away. The soapy water isn't just for cleaning—it acts as a lubricant, helping the blade glide without scratching the glass and causing the glue to clump up for easier removal.
For any extra-stubborn spots, grab a microfiber cloth and dampen it with a little rubbing alcohol or a good citrus-based adhesive remover. A small amount on the cloth, rubbed in a circular motion, should do the trick.
Once all the gunk is gone, give the window one last cleaning with a fresh microfiber towel and a quality, ammonia-free glass cleaner. This will leave your auto glass perfectly clear, streak-free, and ready for a new application of high-performance automotive window tinting if you decide to go that route.
Tackling Stubborn Tint with the Steam Method
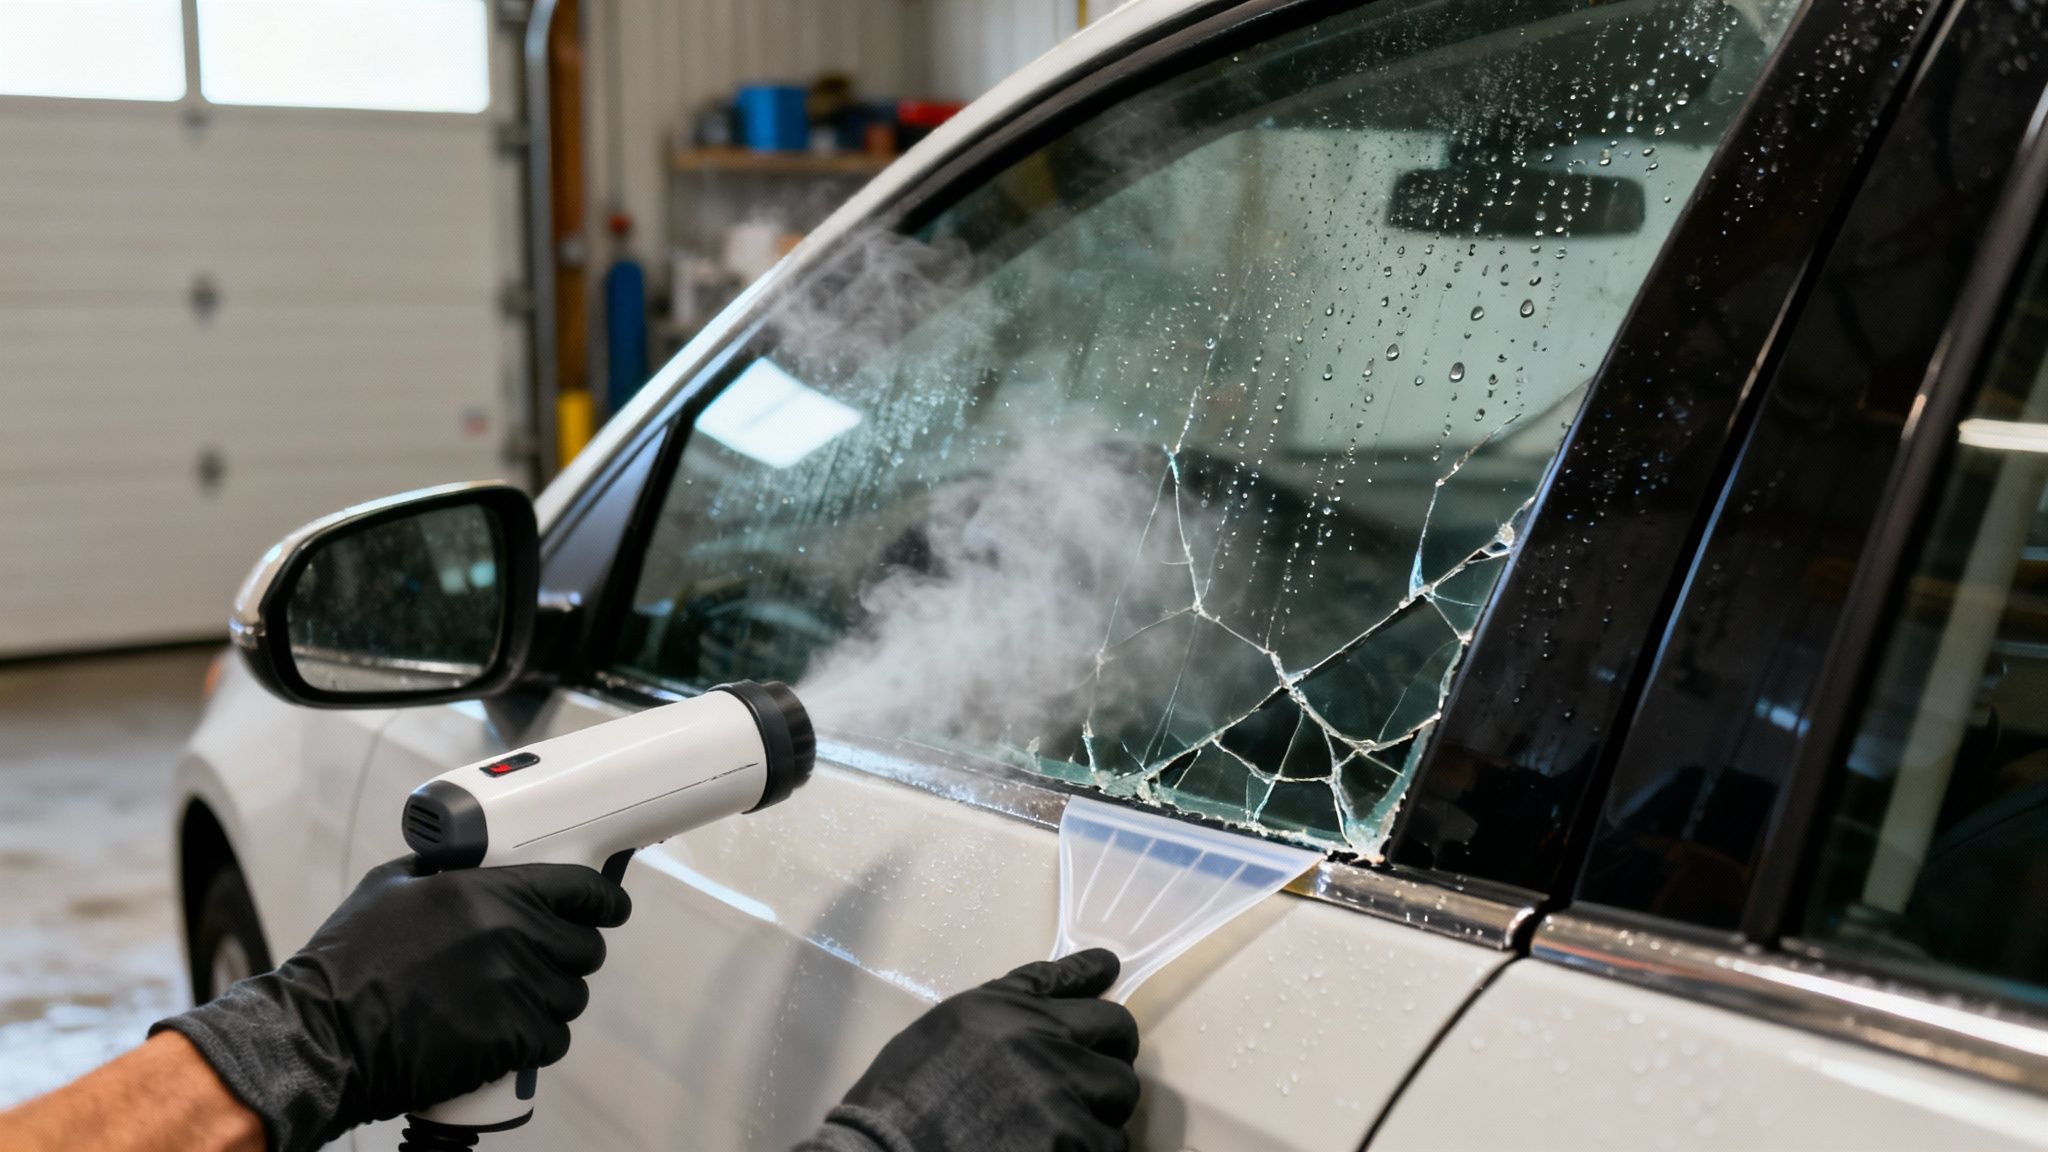
Sometimes, a heat gun just doesn't cut it. When you’re up against car window tint that’s incredibly old, brittle, or was a cheap film from the start, you need a different approach. This is where steam comes in.
The steam method is a favorite among automotive tint pros for a good reason: it’s brilliant at breaking down stubborn, baked-on adhesive that would otherwise cause the tint to shatter into a million tiny, frustrating pieces.
The magic is in the combination of heat and moisture. Unlike the dry heat from a gun, steam gets deep into both the film and the glue underneath. It essentially rehydrates and dissolves the adhesive, convincing it to let go of its decades-old grip on your car's glass.
Prepping for a Steam-Powered Removal
Preparation is everything here, especially since you're introducing a lot of moisture into your car's interior. Protecting your vehicle is even more critical with this method.
- Drape and Cover: Grab some thick plastic sheeting or heavy-duty trash bags. You’ll want to completely cover the door panel, dashboard, and any seats nearby.
- Secure with Tape: Use painter's tape to seal the plastic's edges right up against the window frame. This creates a waterproof barrier, preventing water from getting into your car's electronics or staining the upholstery.
- Absorb Excess Moisture: Line the bottom of the window on the inside with a thick microfiber towel. It will catch the drips and condensation that are guaranteed to run down the glass.
Getting this setup right ensures the only thing getting a steam bath is the tint itself.
Applying Steam for a Clean Release
Once your car's interior is safely wrapped up, you can start the steaming process. A simple fabric or garment steamer with a nozzle attachment is the perfect tool for the job.
Hold the steamer nozzle about one to two inches away from the glass. Don't rush it. Work in slow, deliberate sections, moving back and forth to heat the entire window surface evenly. Your goal is to completely saturate the film with heat and moisture, so be patient and let the steam do its thing.
You’ll start to see signs that the adhesive is giving up. The tint might get cloudy or milky-looking in spots, and you may even see the edges start to lift on their own. That’s your cue—the glue is letting go.
Professional Technique: Fight the urge to focus on just one corner. Instead, steam the entire car window for several minutes to loosen the adhesive uniformly. This massively increases your chances of peeling the whole film off in one satisfying piece.
When the window is thoroughly steamed, use a plastic razor blade to gently lift a corner. Grab the loose film and start peeling slowly and consistently, pulling downward at a sharp angle. If you feel any resistance or hear that dreaded tearing sound, stop. Go back and apply more steam directly to that stubborn spot before you continue. Let the steam do the heavy lifting, not your muscles.
The All-Important Residue Cleanup
Even with a perfect steam application, you'll almost certainly have some sticky residue left behind. The good news? The steam has already softened it up, making the final cleanup much easier.
Spray the window generously with your soapy water solution to keep the leftover adhesive wet. Now, take your plastic scraper and work from the top down, scraping the glue into clumps you can wipe away. The soapy water acts as a lubricant, helping the blade glide without scratching the glass.
For any final stubborn bits, dampen a microfiber cloth with isopropyl alcohol or a citrus-based adhesive remover. Rub the spot in a circular motion until the glass feels perfectly smooth. Finish the job with an ammonia-free glass cleaner for a streak-free, crystal-clear surface.
This steam approach is not only effective but also a much safer, chemical-free option for your car's interior. Industry analysis shows that a staggering 40% of automotive window tint needs removal each year due to problems like bubbling or falling out of compliance with local laws. Professional steam methods boast a 98% first-pass success rate, a huge jump from the 55% success rate for many DIY attempts that can sometimes end in costly glass replacements. You can find more details on this in the latest automotive tinting film market research from Grand View Research.
A clean, residue-free window is the perfect canvas, ready for an upgrade to a modern, high-performance ceramic tint from a trusted professional.
How to Safely Remove Tint from a Rear Window
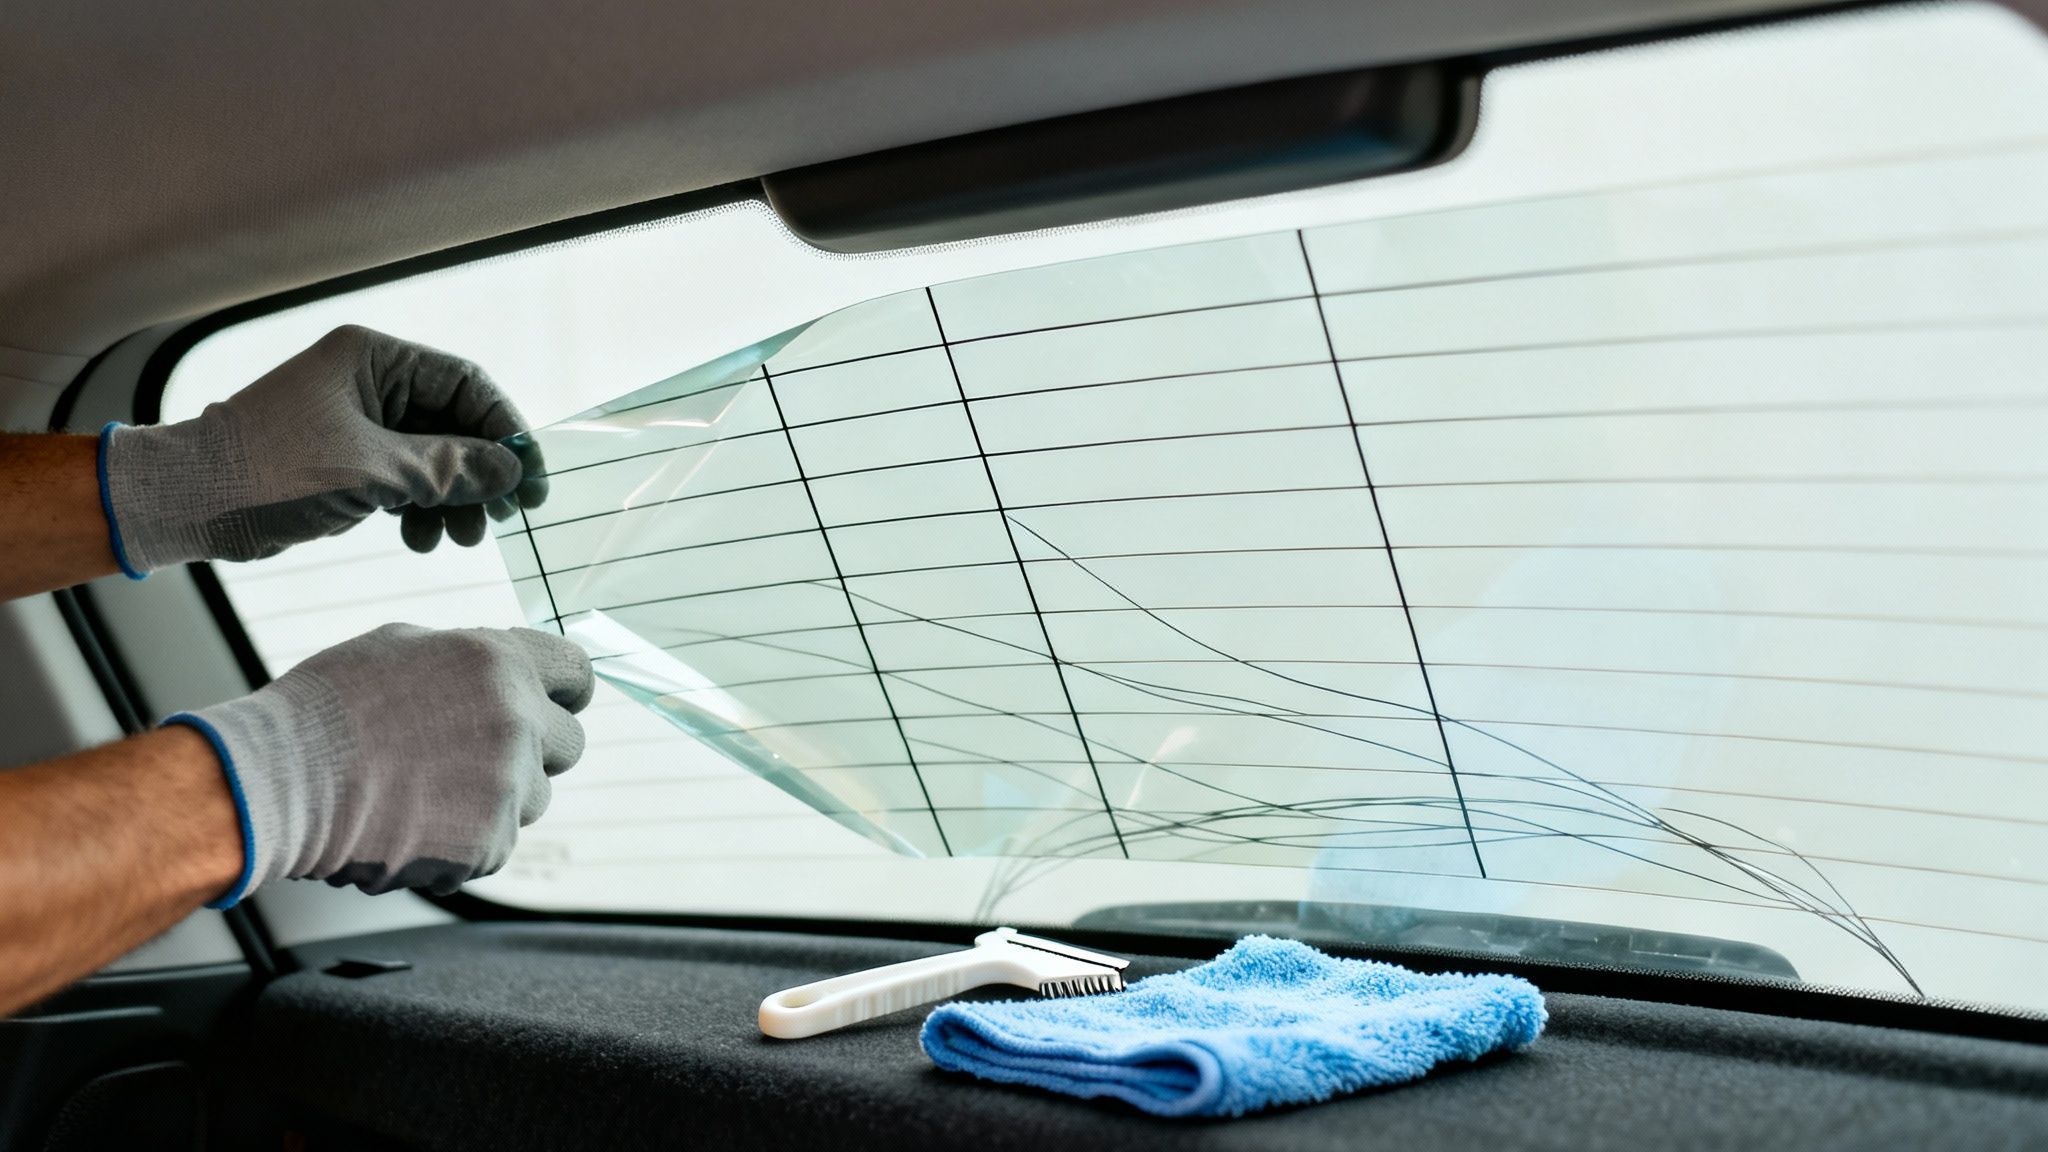
This is it. The rear window is where a DIY tint removal job can go from a bit of a challenge to a full-blown disaster. Why? Because that single piece of glass is home to your car's defroster lines—those delicate heating elements that are incredibly easy to ruin. One wrong move with a sharp tool can sever a line, leaving you with a foggy window and an expensive, frustrating repair bill.
To get the tint off a rear window without a hitch, you have to forget about speed. It’s all about strategy and a whole lot of patience. The goal is simple: work with the defroster grid, not against it. You want to gently coax the old adhesive to release its grip, not rip it off in a fight.
The Tools You Must Avoid
Before we even get into the right way to do it, let's talk about what not to do. The single biggest mistake we see is people taking a metal razor blade to their car's rear window. I can almost guarantee it will scratch the glass and slice right through those thin, conductive defroster lines. Don't do it.
Likewise, stay away from aggressive scrubbing with abrasive materials like coarse steel wool. The defroster grid is essentially printed onto the glass, and any harsh friction can wear it away for good. For this job, stick exclusively to plastic razor blades, soft microfiber cloths, and the chemical or heat methods we’ll cover next.
A broken defroster grid isn't a simple fix. It often requires a specialist to repair or, in the worst-case scenario, a full rear window replacement. Protecting these lines is your absolute top priority.
The Gentle Approach: Heat and Steam
Your two safest and most effective weapons for this task are a fabric steamer or a heat gun on a low setting. Both work by gently warming the film and softening the adhesive underneath. In our experience, the steamer often has an edge here because its moist, penetrating heat is just a bit more forgiving and effective for delicate automotive glass.
Start by protecting your car's rear deck and any interior trim with plastic sheeting and old towels. Then, apply heat or steam evenly across the entire window. Hold your tool a few inches away from the glass and keep it in constant motion—no lingering in one spot. Keep this up for several minutes to make sure the heat soaks through the film and really starts to break down the glue.
Peeling Parallel to the Defroster Lines
Once the window is thoroughly heated, carefully use a plastic razor blade to lift a corner of the film. Now for the most critical part of the whole process: always peel the film parallel to the defroster lines, never perpendicular to them.
Think of it like peeling the film in horizontal strips, moving from the top of the window to the bottom (or vice versa). When you pull in the same direction as the lines, you dramatically reduce the stress placed on them. Pulling across the lines creates a shearing force that can easily lift them right off the glass along with the tint.
Use a slow, steady motion. If you feel any real resistance, stop immediately. Apply more heat or steam to that specific area before you try pulling again. Patience really is your best friend here.
The hard truth is that even with the best technique, the risk of damage is always there. For a component this sensitive, trusting a professional is often the smartest and most cost-effective decision in the long run. At The Tint Guy, our technicians in Kennesaw and Marietta have the experience and specialized equipment to remove tint from rear windows safely, guaranteeing a perfect, damage-free result every single time.
When to Skip the DIY and Call a Professional
Sometimes, the smartest move in any DIY project is knowing when to put the tools down and pick up the phone. While we all love the satisfaction of a job well done, car window tint removal is one of those tasks where a small slip-up can lead to a big, expensive headache. It’s a key part of many successful DIY car maintenance projects to recognize when a pro is the better route.
Let's be real: DIY tint removal takes a ton of time, patience, and a steady hand. It can be messy, frustrating, and, if you're not careful, you could end up with permanent damage to your car's glass.
Scenarios Demanding a Professional Touch
Some automotive tint jobs are just tougher than others. If you're looking at your car and any of these situations sound familiar, calling a professional is easily the safest, wisest choice.
- Extremely Old or 'Baked-On' Tint: Has that tint been on your car for a decade or more? Over time, the sun bakes the film, making it incredibly brittle. Instead of peeling off in nice, satisfying sheets, it’ll likely chip away in a million tiny flakes. A two-hour job can quickly turn into an entire weekend of misery.
- Luxury or High-End Vehicles: Modern high-end cars are packed with complex electronics, intricate window seals, and unique glass curves. One wrong move with a razor blade or heat gun can damage a sensor or slice a seal, leading to a much costlier repair. A professional automotive tint installer knows exactly how to navigate these delicate areas.
- A Flawless Finish is Non-Negotiable: If your goal is to prep the car for a brand-new ceramic tint, the glass has to be absolutely perfect. Any leftover adhesive will ruin the new application. Professionals have the tools and techniques to guarantee a 100% residue-free surface so your new film adheres flawlessly.
At The Tint Guy, we've been serving the North Atlanta area since 1986, and trust us, we've seen it all. Our teams in Kennesaw and Marietta have the experience to tackle the most stubborn, baked-on automotive tint efficiently, protecting your investment and delivering a pristine finish every single time.
The Value of Experience and Peace of Mind
Calling in an expert isn't just about avoiding a chore; it's about protecting your car and guaranteeing a perfect result. Did you know that improper removal is responsible for window damage in up to 40% of home attempts? It's a staggering number.
That’s often when car owners call us. A professional handles everything, from ensuring your next car tint job meets Georgia's 32% light transmission law to prepping the glass perfectly for a new installation.
Hiring an expert buys you efficiency, a guaranteed outcome, and the simple peace of mind that comes from knowing the job was done right the first time.
Your Top Tint Removal Questions, Answered
Got a few lingering questions about getting that old tint off your car? You're not alone. Here are some quick, straightforward answers to the questions we hear most often from car owners.
How Long Does It Take to Remove Car Window Tint?
If you're tackling this as a DIY project for the first time, you'll want to block off a whole afternoon. Seriously. For a professional crew like ours at The Tint Guy, a standard car is usually done in just 2 to 4 hours. The difference comes down to having the right tools and years of experience doing this exact automotive job.
Can Removing Window Tint Damage My Car Windows?
Absolutely, and it's a major risk if you don't know what you're doing. The biggest concern is always the rear car window. Those delicate defroster lines can be easily sliced by a metal razor blade or snapped if you pull the film off with the wrong technique. This is hands-down the number one reason people choose to bring their cars to a professional—to avoid a costly and permanent mistake.
What Is the Hardest Part of Removing Window Tint?
From what we've seen, people struggle with two things the most. First is getting rid of all that sticky, gooey adhesive that the film leaves behind. It’s a tedious, messy job. The second is navigating those defroster lines on the rear glass. It takes a ton of patience and a steady hand to do it right without causing damage. It's almost always a bigger headache than people first expect.
A clean surface is crucial before new tint goes on. Using the wrong products can leave a residue that ruins the new application. To get it right, check out our tips on how to clean tinted windows the safe and effective way.
Is It Worth Paying a Professional for Tint Removal?
For most car owners, the answer is a resounding yes. While doing it yourself might seem like you're saving money, the risk of scratching your auto glass or breaking your defroster is very real. A professional service guarantees a clean, fast, and damage-free removal. You're not just paying for the service; you're buying peace of mind and avoiding a much more expensive repair bill down the road.
When you need a flawless finish without the risk, trust the experts who do this every day. For professional automotive window tinting services in Kennesaw and Marietta, give The Tint Guy a call.