Paint protection film is a fantastic investment for keeping your car's finish pristine, but it’s not a "set it and forget it" solution. Think of it as a shield—it takes all the hits so your paint doesn't have to. But eventually, that shield wears down from UV exposure, road debris, and general wear and tear.
Recognizing when your PPF is past its prime is crucial. Ignoring the warning signs doesn't just look bad; it can make removal a nightmare and even risk damaging the very paint you wanted to protect.
Knowing When to Remove Your Paint Protection Film
High-quality paint protection film is incredibly durable, but it has a finite lifespan, typically somewhere between five to ten years. Over that time, the film's protective qualities fade, and its appearance can start to go downhill. Catching the signs of failure early makes the removal process much smoother and safer for your vehicle.

Common Signs of PPF Failure
So, what should you be looking for? Some signs are subtle, while others are impossible to miss. As experts in automotive film application and removal, we see these issues all the time, and they're clear indicators that your film's tour of duty is over.
To make it easier, here’s a quick rundown of the most common symptoms we see, what they mean, and why you shouldn't ignore them.
| Signs Your PPF Needs Removal | ||
|---|---|---|
| Symptom | Description | Risk If Ignored |
| Yellowing or Discoloration | The film develops a yellowish, cloudy tint from prolonged UV exposure. It’s most obvious on white or light-colored vehicles. | Makes your car look old and neglected. The film will become more brittle and difficult to remove. |
| Peeling or Lifting Edges | The edges of the film start to curl up and separate from the paint surface, often collecting dirt and grime underneath. | Trapped moisture can lead to corrosion or paint issues. The film will continue to peel, losing its protective function. |
| Bubbling or Blistering | Pockets of air or water get trapped between the film and the paint, signaling a failure of the adhesive layer. | Looks unsightly and indicates widespread adhesive failure. Can make removal tricky as the film may tear easily. |
| Cracking or Brittleness | The film loses its flexibility and develops a spiderweb-like pattern of fine cracks across the surface. | A clear sign the film is old and breaking down. It will likely come off in tiny, frustrating pieces instead of a single sheet. |
| Punctures or Deep Scratches | The film has deep gouges or tears that have gone all the way through, exposing the paint underneath. | The film has done its job but can no longer protect that area. Dirt and water can get under the film through the puncture. |
Seeing any of these signs means it's time to start planning for removal. Don't wait until the problem gets worse.
Why Timely Removal Matters
Putting off PPF removal when it's clearly failing is a recipe for a headache. As the film and its adhesive age, they become brittle and bake onto your car's clear coat. Instead of peeling off in a large, satisfying sheet, the film will fight you every step of the way, breaking into countless small flakes. This turns a straightforward job into a tedious, painstaking ordeal.
Worse yet, that hardened adhesive can become so bonded to the paint that trying to pull it off without the right technique can lift the clear coat—or even the paint—right along with it.
We see this all the time. As leading automotive film specialists serving car owners in both Kennesaw and Marietta, we find that 30-40% of cars with PPF that's 5-7 years old show significant yellowing or edge lifting. It’s a common issue that often requires professional help to resolve without damaging the paint.
The global PPF market was valued at over USD 502 million in 2024, which means a lot of cars on the road are going to need this service eventually. Unfortunately, improper installations can cause premature failure in up to 20% of cases in the U.S., leading to bubbling and peeling long before the film's expected lifespan is up. If you're curious about how long your film should ideally be lasting, our guide on how long PPF lasts has some great insights.
Essential Tools for a Safe DIY PPF Removal
We’ve seen it happen too many times: a car owner decides to rip off old paint protection film and ends up with a much bigger, more expensive problem. Trying to tackle PPF removal without the right gear is a recipe for damaging your car's paint, full stop.
Getting your tools together isn't just about preparation; it's about preventing disaster. Having everything you need within arm's reach means you won't be tempted to grab something—like a metal scraper—that could cost you a trip to the body shop.
Heat Sources and Safety Gear
The absolute key to this entire process is heat. It's what softens the film and, more importantly, loosens the adhesive's grip on your paint. Without controlled heat, you're just pulling on brittle plastic and asking for trouble.
- Heat Gun or Steamer: A heat gun is the pro's choice for fast, direct heat, but it demands respect. You have to keep it moving constantly to avoid scorching the paint. For a gentler, more forgiving approach, a fabric steamer is fantastic. The moist heat is incredibly effective at softening the adhesive and is much safer for beginners.
- Heat-Resistant Gloves: This is non-negotiable. You're working with tools that get very hot, and the film itself will retain that heat. A good pair of gloves protects your hands from burns, letting you work safely and without rushing.
- Safety Glasses: A simple but crucial piece of gear. You'll be dealing with hot vapor, chemical cleaners, and potentially little bits of film flying off. Protect your eyes.
Tools for Peeling and Scraping
Once the film is warm and pliable, you'll need the right tools to gently lift it off and clean up the sticky mess it leaves behind.
CRITICAL TIP: We can't say this enough: Never use metal tools on your car's paint. A metal razor blade will slice right through your clear coat before you even realize what's happened. The tools listed here are made to be safe on automotive paint when you use them the right way.
- Plastic Razor Blades: These will be your best friend for this job. They have a sharp enough edge to get underneath the film and to scrape away stubborn adhesive, but they're soft enough not to dig into your paint.
- High-Quality Microfiber Towels: Stock up on a good number of clean, plush towels. You’ll use them for applying adhesive remover, wiping away the gunk, and drying everything off. Using an old, dirty shop rag is a great way to put fine scratches right back into the paint you just saved.
- Automotive Adhesive Remover: Don't just grab any goo-remover from your garage. Find a product specifically made for automotive use that is labeled "paint-safe" or "body-shop safe." These are formulated to break down the adhesive without eating into your car's clear coat.
- Spray Bottle with Soapy Water: A simple mixture of water and a few drops of a quality car wash soap is a perfect lubricant. A quick spritz on the surface before you scrape at leftover adhesive reduces friction and helps prevent any accidental marring.
A Practical Guide to Removing Old Automotive PPF
Alright, you've got your tools laid out and you're ready to tackle the main event: getting that old paint protection film off your car. Before you jump in, we have to stress one thing—patience. Rushing the heating and peeling stage is the single biggest mistake we see, and it’s what leads to damaged paint. Go slow, be methodical, and you'll get a professional result.
First things first, give the panel you're working on a thorough wash and dry. Any dirt or grit left on the surface can get dragged around as you peel the film, leaving behind fine scratches in your clear coat. A clean surface is your best insurance policy against accidental damage.
The Heating and Peeling Technique
The whole game here is using controlled heat. You want to soften the film’s adhesive just enough to make it let go of the paint. Think consistent, gentle warmth—not scorching, bubbling heat.
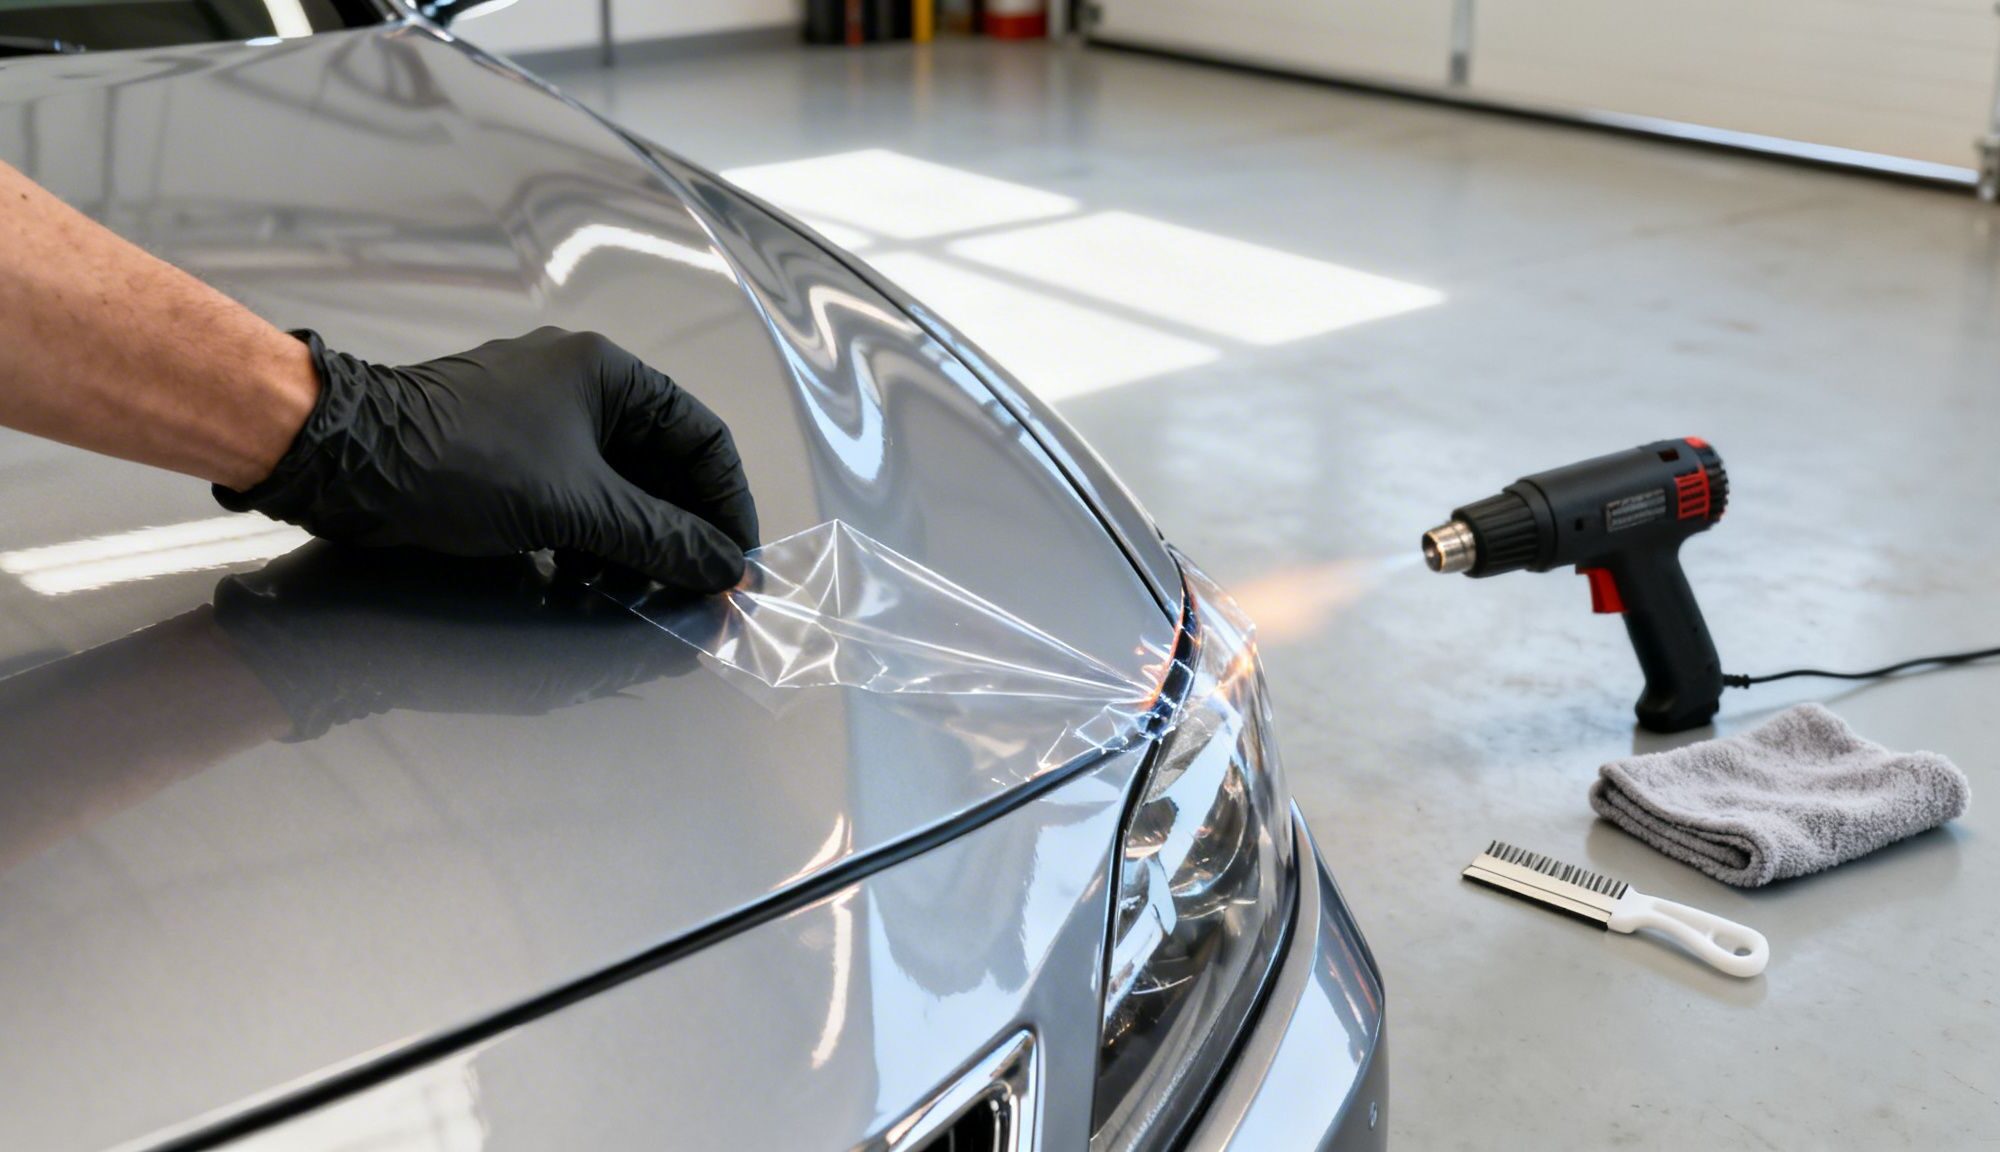
Look for a corner or an edge that’s already started to lift. That’s your golden ticket, a natural place to start peeling. Grab your heat gun or steamer and hold it about 6-8 inches from the surface. The key is to keep it moving in slow, even sweeps. Never let the heat sit in one spot; that’s how you burn or bubble the paint underneath.
You’ll feel the film get softer as it warms up. Once it's warm to the touch (but not burning hot, even with gloves), you can use a plastic razor blade to gently pry that starting corner up.
Pro Tip: Your peeling angle is everything. Once you have a grip, pull the film back on itself at a low, sharp angle. You want to stay under 45 degrees. Whatever you do, don't pull straight up and away from the car. That puts a ton of stress on the clear coat and is the fastest way to pull paint right off with the film.
Our advice is to work in small, manageable sections, maybe 2×2 feet at a time. This keeps the heat consistent and stops the panel from cooling down before you can peel the film. Heat a section, peel it, then move on.
This diagram breaks down the basic flow for a successful removal, showing you how the tools come into play at each stage.
It really is a simple process: apply heat to loosen the film, use a safe tool to lift and peel, and then deal with whatever gunk is left behind.
Managing Expectations and Common Hurdles
Even if you do everything right, you can still run into a few snags, especially with older, sun-baked film. If the PPF is brittle, it might start tearing into tiny little pieces instead of coming off in a nice, big sheet. It’s frustrating, we know, but the only answer is more patience. Just keep applying gentle heat to each little piece and peel them away one by one.
It’s no surprise that a lot of people are trying to tackle this themselves. We've seen demand for PPF removal grow by 22% each year in major markets like Marietta and Kennesaw since 2022. This lines up with the film's typical 5-10 year lifespan and the high cost of professional removal, which can run anywhere from $1,500 to $3,000. In fact, a 2023 study found that 25% of installations show edge lifting, which is a big reason car owners call us for help.
Now, if the film on your car has self-healing paint protection film properties, you might find it puts up more of a fight. These higher-end films have tougher topcoats and stronger adhesives. The same removal method works, but you'll probably need to apply a bit more steady heat to convince the adhesive to let go.
Follow these steps, take your time, and you can absolutely get that old PPF off your car safely, leaving you with a clean slate for whatever comes next.
How to Clean Up Stubborn Adhesive Residue

Even if you peeled the film off perfectly, you’re almost guaranteed to find some sticky adhesive left on your car’s paint. Don’t panic—this is a totally normal part of the process. How you tackle it, though, is what separates a great DIY job from a potential disaster for your clear coat.
The golden rule here is to start with the least aggressive method and only move to something stronger if you absolutely have to.
Your first weapon of choice should always be a dedicated automotive adhesive remover. These products are formulated specifically to be tough on glue but safe on your car's finish. Spray the remover on a small section and let it sit for the time recommended on the bottle, which is usually around 30 to 60 seconds.
This dwell time is non-negotiable; it gives the chemicals a chance to work their magic and break down the adhesive. Once it’s had a moment to work, just use a clean microfiber towel to gently wipe the gunk away.
Tackling More Stubborn Spots
So, what happens if that first wipe-down doesn't get everything? It’s time to bring back your plastic razor blade for a little extra mechanical help.
- Lube it Up: First, generously spray the area with a mix of car soap and water. You want the surface slick. This lubrication helps the blade glide smoothly and dramatically reduces any risk of scratching the paint.
- Get the Angle Right: Hold the plastic blade at a very shallow angle to the paint. Use gentle, even pressure to scrape the now-softened adhesive away.
- Wipe, Check, and Repeat: After a few passes, clean the area with your microfiber towel and see how you did. You may need to repeat the cycle of spraying adhesive remover, letting it dwell, and gently scraping until the surface is completely clean.
For those truly nasty, baked-on spots, a rubber eraser wheel on a drill can be a lifesaver. But be warned: this tool generates heat and friction. Use it with extreme caution and only as a last resort. Keep the drill on a low speed, use very light pressure, and never, ever hold it in one spot for more than a second or two. You can easily burn right through the paint if you’re not careful.
While the surfaces are different, some of the core principles of breaking down stubborn contaminants are universal. For a different perspective, checking out guides on removing different types of stubborn stains like grease can offer some useful insights into the chemistry of cleaning.
The Final Finishing Touch
Once all the visible adhesive is gone, the job still isn't quite done. Your paint might feel a little tacky to the touch or have microscopic gunk still bonded to it. This is where a clay bar treatment works wonders.
Working on a well-lubricated surface (you can use your soap-and-water mix or a dedicated clay lube), just glide a detailing clay bar back and forth over the paint. You will literally feel it grabbing and pulling out the last bits of residue.
The result is a perfectly smooth, glass-like finish. This final cleansing step ensures your car's paint is completely decontaminated and prepped for a fresh polish, wax, or a new layer of protection.
Post-Removal Paint Care and Professional Alternatives
Alright, so you’ve wrestled that last piece of film off the car. Job done? Not quite. Getting the PPF off is really only half the job. The next few steps are what will truly restore your car’s finish and get it ready for whatever comes next. You’ve just uncovered paint that’s been hidden away for years, so it’s going to need a little TLC.
First thing’s first: you need to give that paint a really good look. Pull the car out into the sun or under some bright garage lights and inspect it from every angle. What you’re looking for are the subtle things—any leftover haze from the adhesive, light scuffs from the removal process, or even a slight difference in shine between the areas that were covered and those that weren’t.
Restoring and Protecting Your Paint
If you’re seeing some minor swirl marks or the finish just looks a bit dull, a light polish is your best friend here. It’ll bring back that factory depth and gloss. For tackling any light hazing or swirls left after pulling the film, an orbital buffer polisher is perfect for getting a pro-level finish. Just make sure you’re using a fine-cut polish with a soft foam pad. Work gently; the goal is to perfect the paint, not create new problems.
Once polished, that paint is completely bare and exposed. You absolutely need to get a new layer of protection on it as soon as you can. You’ve got a few solid choices:
- Car Wax: The classic choice. It gives a warm glow and provides protection for a few months.
- Paint Sealant: This is a synthetic polymer that will outlast wax, typically giving you 4-6 months of solid protection.
- Ceramic Coating: For the ultimate, long-term defense, a ceramic coating creates a hard, slick, chemical-resistant barrier that can last for years.
Picking between these is a big decision for your car's future. If you're weighing your options, especially the more durable ones, our guide on paint protection film vs. ceramic coating is a great resource that lays out all the pros and cons.
When to Call the Professionals
While we love a good DIY project, sometimes the smartest and safest move is to hand the keys to a professional. Knowing when to call it quits is a skill in itself and can save you from a very expensive mistake.
Professional removal is simply safer for your paint. Data shows that a pro job preserves about 95% of the original paint quality, a big jump from the 70% typically seen with DIY attempts. Botched jobs often lead to chipping, a problem that affects 35% of DIY removals. With searches for 'PPF removal near me' up 30% in 2024, it's clear more owners are seeing the value in professional expertise.
Think about calling in an expert if you run into any of these situations:
- The Film is Extremely Old or Brittle: If the PPF is cracking, yellowed, and coming off in tiny, frustrating flakes, a pro has the right tools and patience to get it done right without damaging your paint.
- You're Uncomfortable Using a Heat Gun: Worried about burning or blistering your paint? Don't risk it. A skilled technician has a feel for exactly how much heat is needed and where to apply it.
- Your Vehicle Has a Non-Factory Paint Job: Repainted cars are a huge red flag. The bond between the new paint and the panel is often weaker, making it much more likely to lift during removal. Professionals know how to test the surface and proceed with extreme caution.
For car owners in the Kennesaw and Marietta area, The Tint Guy offers expert PPF removal services. We’ll get that old film off safely and leave you with a perfectly clean slate, ready for its next chapter in paint protection. Schedule your tint appointment today!
Answering Your Top PPF Removal Questions
Even with a step-by-step guide, it's natural to have a few more questions. When you're dealing with something as precious as your car's paint job, you want to be completely sure about the process. We get it. Here are some quick, straightforward answers to the questions we hear most often from car owners about taking off old paint protection film.
How Long Does It Take to Remove PPF from a Car?
Honestly, the time it takes can be all over the map. The biggest factors are the size of your vehicle and, most importantly, the age and condition of the film itself. If you're tackling a partial front end (like the bumper and part of the hood) as a DIY project, you should probably block off a solid 4 to 8 hours.
Trying to remove film from a full vehicle? That could easily turn into a full weekend project. The real wild card is old, cracked, or sun-baked film. It becomes incredibly brittle and will fight you every step of the way, coming off in tiny, frustrating pieces instead of large sheets. This is where professionals have a huge advantage; with experience and the right tools, we can often strip a full car in 3 to 6 hours.
Can Removing PPF Damage My Car's Paint?
Yes, unfortunately, it absolutely can. If you're not careful, the risk of damaging your paint is very real. The most common disaster we see from a botched removal is the film pulling up the clear coat or, even worse, the paint itself. This is especially true for any panels that have been repainted.
Beyond that, other potential slip-ups include:
- Scratches: Using the wrong tool, like a metal razor blade or a sharp plastic scraper, can leave permanent scratches or gouges in your paint.
- Burns: Lingering in one spot for too long with a heat gun can easily burn or warp the paint underneath.
- Chemical Stains: Grabbing a harsh, non-automotive solvent to get rid of leftover adhesive can stain or even eat right through your clear coat.
If you know your car has a non-factory paint job, the risk of lifting the paint goes up dramatically. In those situations, we always recommend bringing it to a professional. It’s the safest way to avoid a very expensive trip to the body shop.
What Is the Average Cost for Professional PPF Removal?
The price for a professional removal really depends on how much of the car is covered and what kind of shape the film is in. For a standard partial front end, you can typically expect the cost to be somewhere between $200 and $500.
A full-car removal is a much bigger, more labor-intensive job, and the price reflects that. This usually runs anywhere from $500 to over $1,500. The cost will always lean toward the higher end of that range if the film is old, brittle, and needs a ton of extra work to remove every last bit of adhesive residue.
At The Tint Guy, we serve car enthusiasts all over the Kennesaw and Marietta areas and believe in total transparency. We’ll always give you a clear, upfront quote for your specific vehicle before we start any work. That way, there are absolutely no surprises. Call for a free consultation today.